Carrier Management
Overview
The Carrier Management system in Zora Tech Logistics Platform allows you to configure and manage shipping carriers, their service levels, cutoff times, and pickup schedules. This comprehensive guide will walk you through all aspects of carrier configuration and management.
Key Features: - Multi-carrier support (UPS, FedEx, USPS, regional carriers, etc.) - Service level configuration with individual cutoff times - Pickup schedule management - Active/inactive carrier status control - SCAC code tracking for freight carriers - Account number management - Minimum order value thresholds
Table of Contents
- Getting Started
- Accessing Carrier Management
- Understanding Carrier Information
- Adding a New Carrier
- Managing Service Levels
- Editing Carrier Details
- Carrier Status Management
- Search and Filtering
- Freight Forwarding Integration
- Best Practices
- Troubleshooting
Getting Started
Prerequisites
Before managing carriers, ensure you have:
- Admin Access: Carrier management requires administrative permissions
- Carrier Account Information: Account numbers, codes, and service details
- Service Level Information: Cutoff times, transit times, and service codes
- SCAC Codes: For freight carriers (Standard Carrier Alpha Code)
Key Concepts
Carrier: A shipping or logistics company (e.g., UPS, FedEx, regional freight)
Service Level: Specific shipping services offered by a carrier (e.g., Ground, Express, Overnight)
Cutoff Time: Daily deadline for orders to be included in same-day pickup
Pickup Schedule: Days when the carrier picks up from your facility
SCAC Code: 2-4 character code used in freight/EDI transactions
Default Service Level: The service automatically selected when creating shipments
Accessing Carrier Management
Navigation
- Click Shipping & Receiving in the left sidebar
- Select Carriers
- The Carrier Management page displays all configured carriers
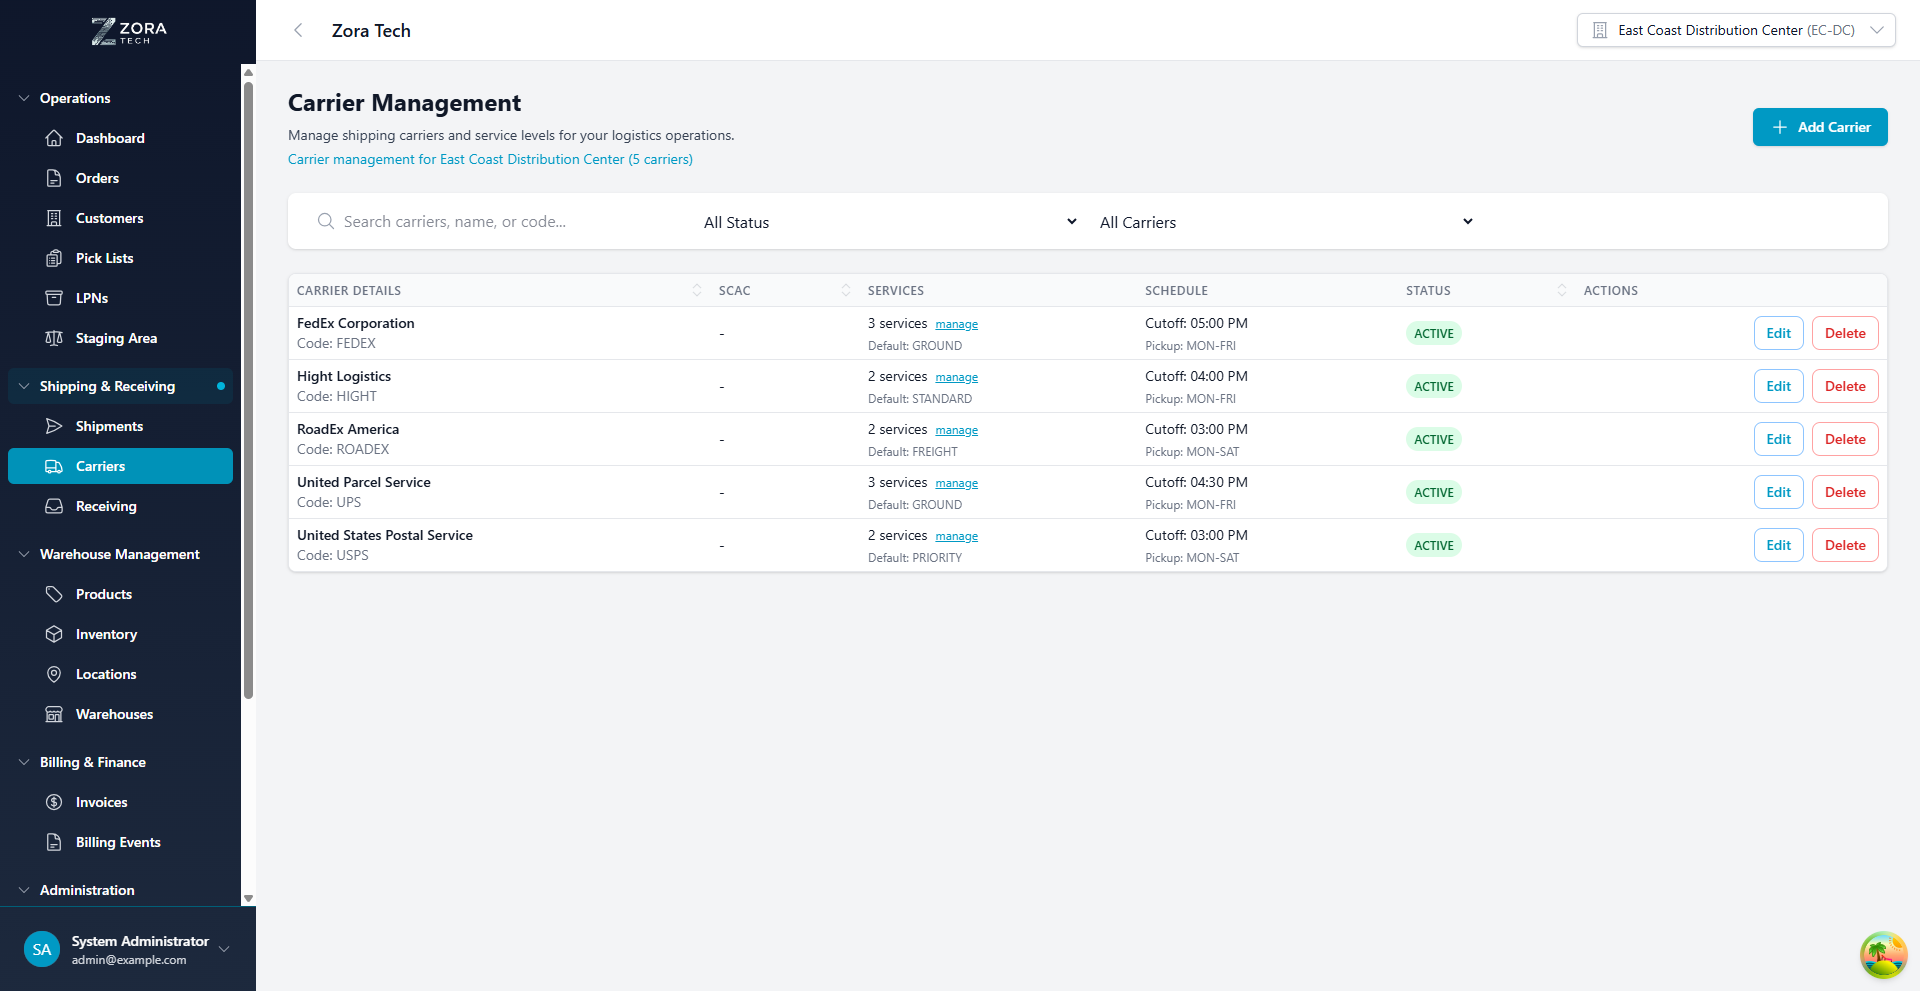
Page Layout
The Carriers page includes:
- Header: Shows total carrier count and warehouse context
- Add Carrier Button: Create new carrier configurations
- Search & Filters: Find carriers by name, code, status, or service availability
- Carriers Table: Lists all carriers with key details
- Action Buttons: Edit or delete carriers directly from the table
Understanding Carrier Information
Carrier Table Columns
| Column | Description |
|---|---|
| Carrier Details | Name, code, and account number |
| SCAC | Standard Carrier Alpha Code (for freight) |
| Services | Number of configured service levels + manage link |
| Schedule | Cutoff time and pickup schedule |
| Status | Active or Inactive badge |
| Actions | Edit and Delete buttons |
Carrier Details Display
Each carrier row shows: - Carrier Name: Full company name - Code: Internal carrier code (e.g., UPS, FEDEX) - Account Number: Your account with the carrier (if provided) - Service Count: Number of configured service levels - Default Service: The default shipping service - Cutoff Time: Daily pickup deadline - Pickup Schedule: Days carrier picks up
Adding a New Carrier
Step 1: Open Add Carrier Modal
- Click the Add Carrier button (top right)
- The Add New Carrier modal opens
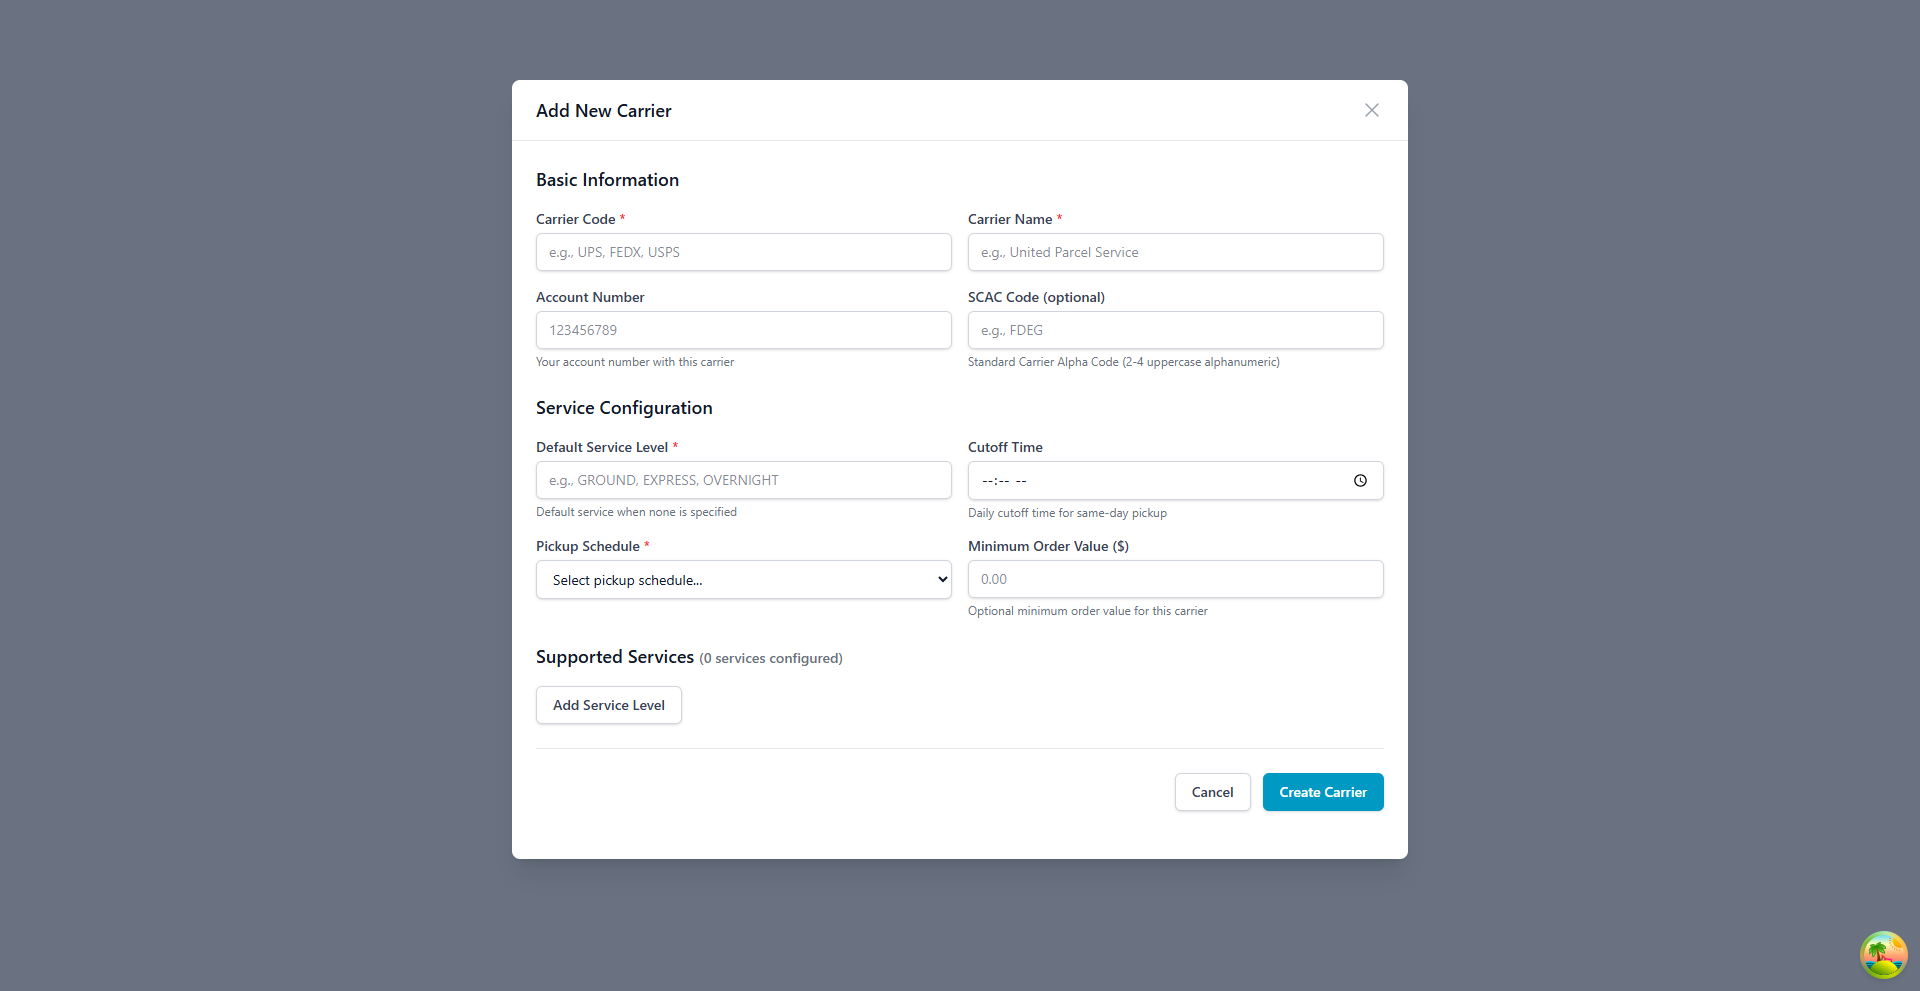
Step 2: Enter Basic Information
Required Fields
Carrier Code * - Short identifier (e.g., UPS, FEDEX, USPS) - Used internally in the system - Must be unique
Carrier Name * - Full company name (e.g., United Parcel Service) - Displayed to users throughout the system
Optional Fields
Account Number - Your account number with this carrier - Used for billing and tracking purposes
SCAC Code - Standard Carrier Alpha Code - 2-4 uppercase alphanumeric characters - Required for freight carriers and EDI transactions - Examples: FDEG (FedEx), UPGF (UPS Ground Freight)
Step 3: Configure Service Settings
Default Service Level * - Service used when none is specified - Examples: GROUND, EXPRESS, OVERNIGHT, STANDARD - Should match one of your service levels
Cutoff Time - Daily deadline for same-day pickup - Format: HH:MM (24-hour time) - Example: 17:00 for 5:00 PM
Pickup Schedule * Select from predefined options: - Daily - Monday to Friday - Tuesday & Thursday - Monday, Wednesday & Friday - On Demand - Custom Schedule
Minimum Order Value ($) - Optional minimum order threshold - Orders below this value may incur additional fees - Leave at 0.00 if no minimum
Step 4: Add Service Levels (Optional)
While you can add service levels during carrier creation, it's often easier to: 1. Create the carrier first 2. Then manage service levels separately (see Managing Service Levels)
Click Add Service Level to configure services during creation if needed.
Step 5: Create Carrier
- Review all entered information
- Click Create Carrier
- The carrier appears in the list immediately
Managing Service Levels
Service levels define specific shipping services offered by each carrier.
Viewing Service Levels
Method 1: Quick View 1. Find the carrier in the table 2. Click the manage link in the Services column
Method 2: Details Modal 1. Click on any carrier row 2. View the Service Levels section in the details modal
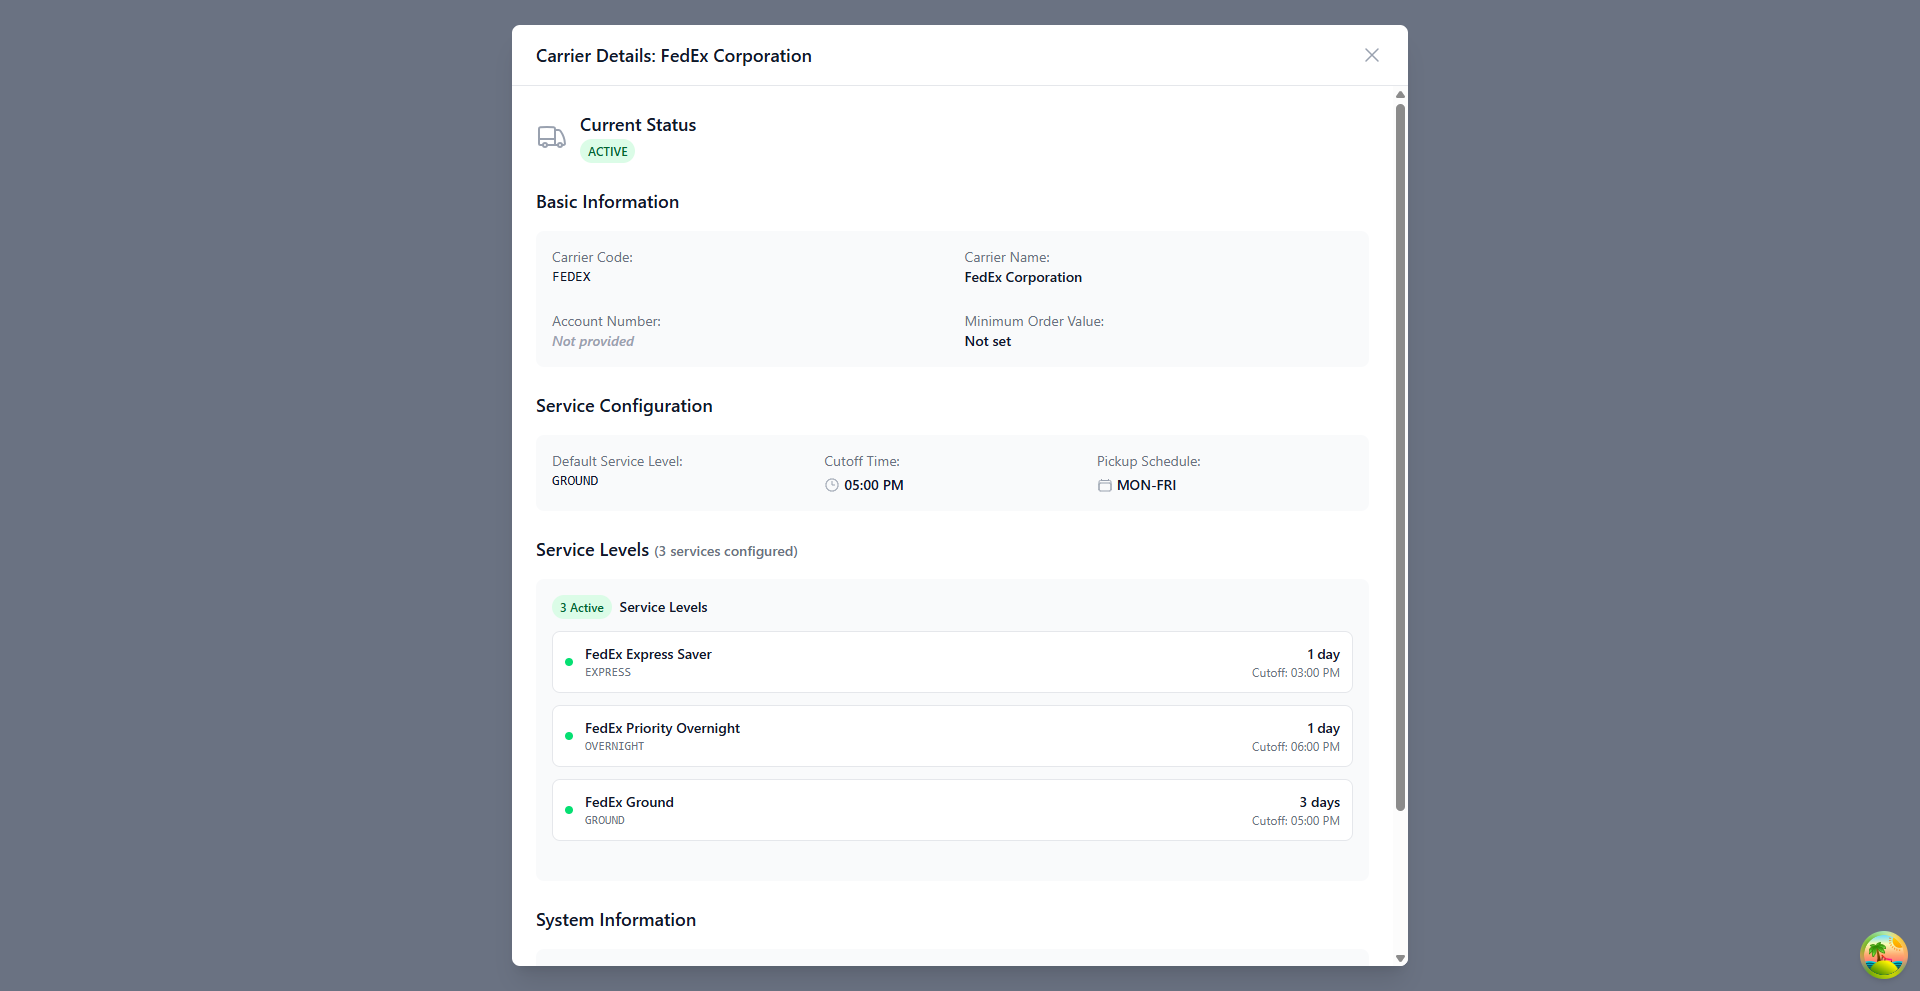
Service Level Management Modal
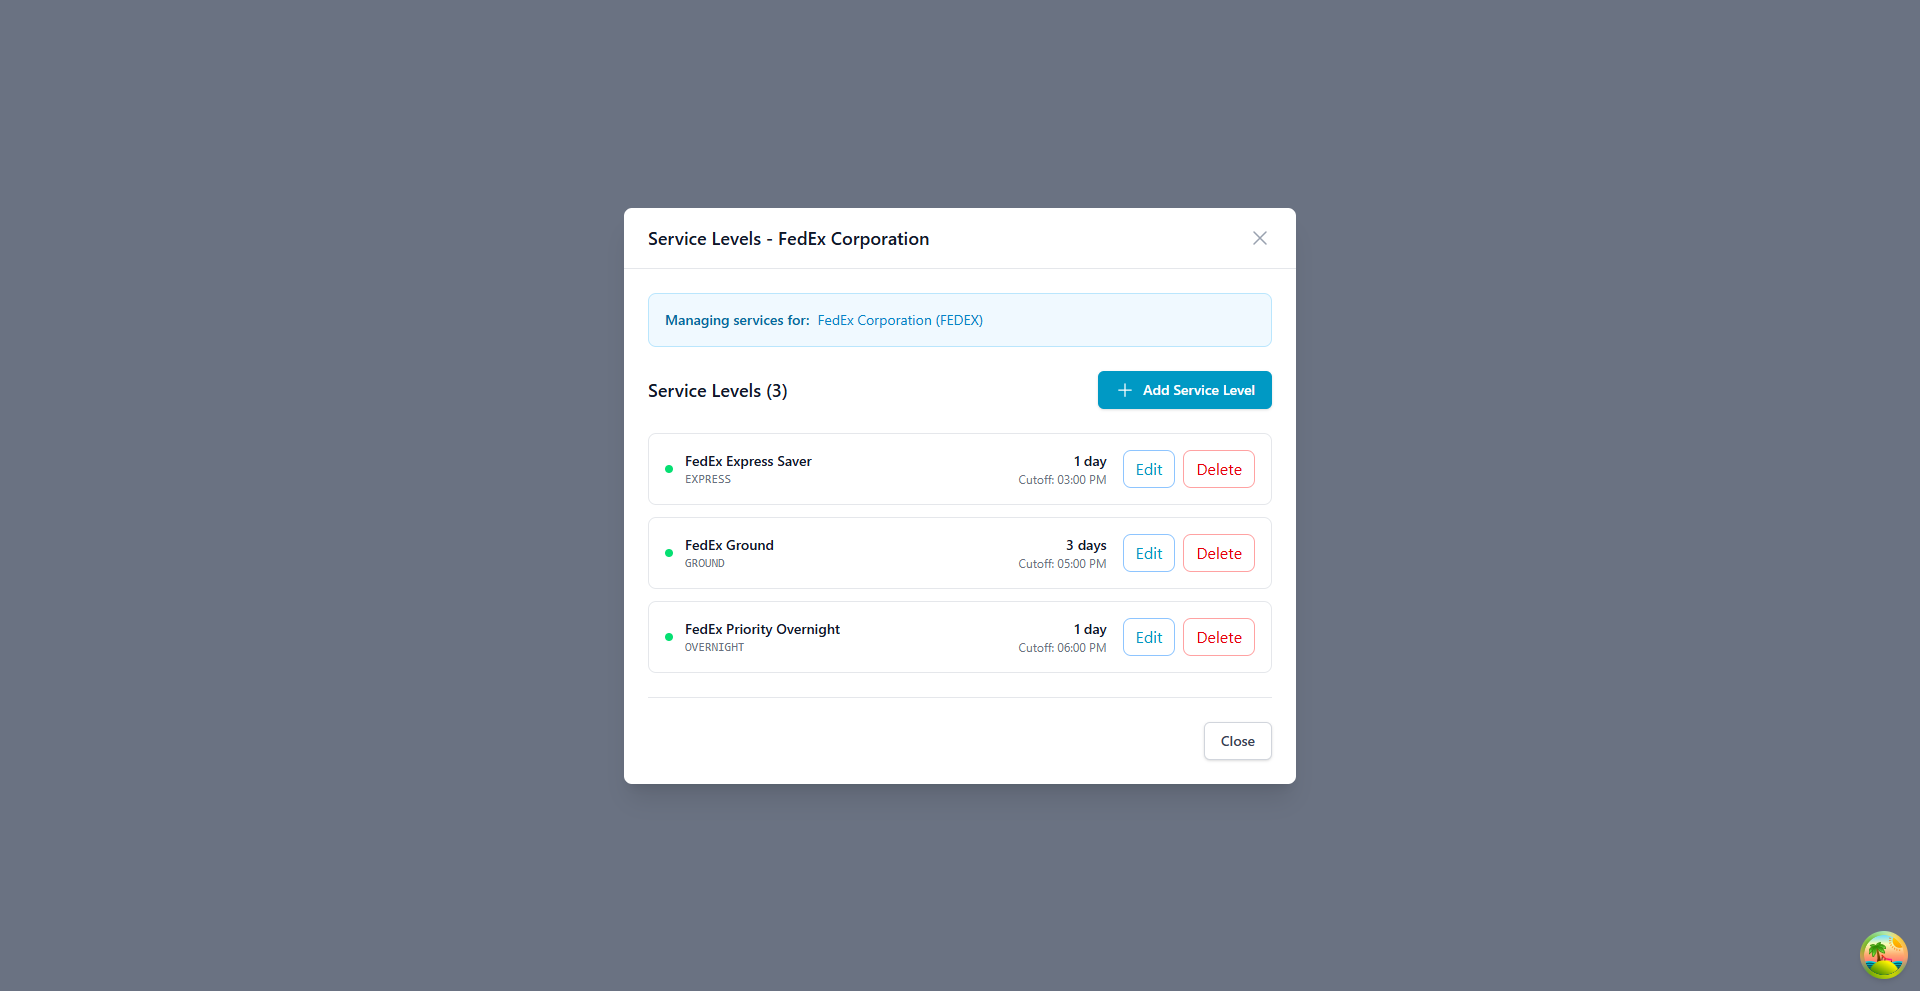
The Service Levels modal displays: - Carrier Information: Name and code - Service Count: Total configured services - Service List: All services with details - Add Service Level Button: Create new service
Adding a Service Level
- Open the Service Levels modal
- Click Add Service Level
- Enter service details:
Service Name - Display name (e.g., "FedEx Ground", "UPS Next Day Air")
Service Code - Internal code (e.g., GROUND, EXPRESS, OVERNIGHT) - Must be unique per carrier
Transit Time (Days) - Expected delivery time - Used for rate shopping and customer expectations
Cutoff Time - Specific cutoff for this service - May differ from carrier's general cutoff - Format: HH:MM
Active Status - Enable/disable this service level - Inactive services won't appear in service selection
- Click Save to add the service
Editing a Service Level
- Open the Service Levels modal
- Click Edit on the service to modify
- Update service details
- Click Save
Deleting a Service Level
- Open the Service Levels modal
- Click Delete on the service to remove
- Confirm deletion
Delete Warning
Deleting a service level cannot be undone. Ensure no active shipments are using this service before deletion.
Editing Carrier Details
Opening the Edit Modal
Method 1: Action Button 1. Find the carrier in the table 2. Click the Edit button in the Actions column
Method 2: Row Click 1. Click anywhere on the carrier row 2. Click Edit from the details modal
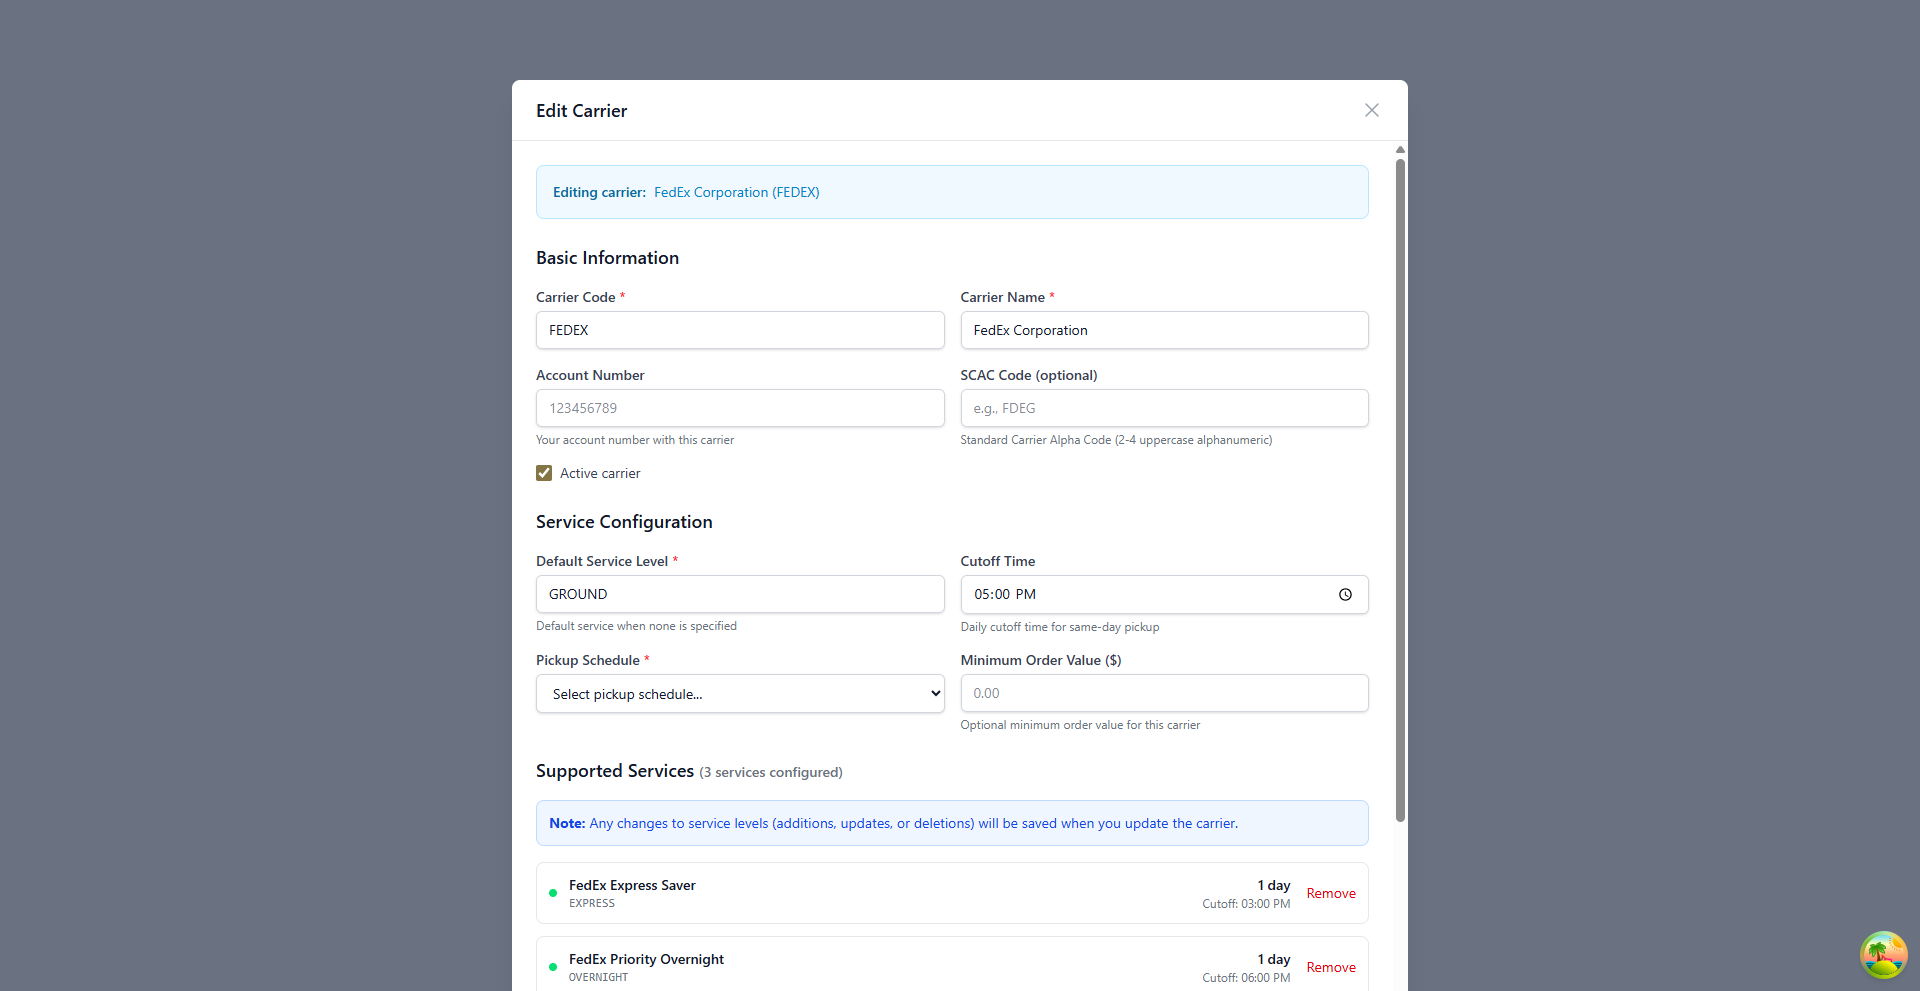
Editable Fields
All carrier information can be updated:
Basic Information - Carrier Code - Carrier Name - Account Number - SCAC Code - Active/Inactive status
Service Configuration - Default Service Level - Cutoff Time - Pickup Schedule - Minimum Order Value
Supported Services - Add new service levels - Remove existing services - Edit service details
Service Changes
Any changes to service levels (additions, updates, or deletions) are saved when you click Update Carrier & Services.
Updating a Carrier
- Make your changes in the Edit Carrier modal
- Review all modifications
- Click Update Carrier & Services
- Changes take effect immediately
Carrier Status Management
Active vs Inactive Status
Active Carriers - Available for shipment creation - Appear in carrier selection dropdowns - Service levels are accessible - Green "ACTIVE" badge in table
Inactive Carriers - Not available for new shipments - Existing shipments remain unaffected - Hidden from carrier selection - Gray "INACTIVE" badge in table
Changing Carrier Status
Method 1: Edit Modal 1. Open the Edit Carrier modal 2. Toggle the Active carrier checkbox 3. Click Update Carrier & Services
Best Practice: Instead of deleting carriers, mark them inactive to preserve historical data.
When to Inactivate a Carrier
- Terminated carrier relationship
- Seasonal carrier (off-season)
- Testing new carrier configurations
- Rate negotiations in progress
- Service quality issues
Search and Filtering
Search Functionality
The search bar filters carriers by: - Carrier name - Carrier code - Account number (partial matches)
Example Searches: - "FedEx" - Finds FedEx Corporation - "UPS" - Finds United Parcel Service and UPS freight - "FEDEX" - Finds carriers with code FEDEX
Filter Options
Status Filter - All Status: Shows all carriers - Active: Only active carriers - Inactive: Only inactive carriers
Services Filter - All Carriers: Shows all carriers - With Services: Only carriers with configured service levels - No Services: Only carriers without service levels
Clearing Filters
When filters are active: 1. The Clear Filters button appears 2. Click to reset all filters 3. Full carrier list displays
Freight Forwarding Integration
Overview
The Zora Tech platform includes integrated freight forwarding capabilities for LTL (Less Than Truckload) and freight shipments. This allows you to request rate quotes, book shipments, generate Bills of Lading (BOL), and track freight shipments directly from the platform.
Supported Freight Carriers:
- TForce WorldWide (formerly UPS Freight) - National LTL carrier
- Unishippers / Speedship - Multi-carrier freight network
- Additional carriers via API integration
Key Freight Forwarding Features
Rate Quotes: - Request real-time rate quotes from multiple carriers - Compare pricing, transit times, and service options - Select accessorial services (liftgate, residential, etc.) - View detailed cost breakdowns
Shipment Booking: - Book shipments directly from rate quotes - Specify pickup and delivery time windows - Add reference numbers and special instructions - Automatic confirmation and scheduling
Bill of Lading (BOL): - Generate professional BOL documents - Download PDF for printing - BOL includes all shipment details - Barcode for carrier scanning
Shipment Tracking: - Real-time status updates - Track by PRO number or BOL number - Delivery notifications - Exception alerting
Proof of Delivery: - View POD after delivery - Consignee signature capture - Delivery date and time confirmation
Freight Carrier Configuration
Setting Up Freight Carriers:
When adding freight carriers to the system:
- Use Standard SCAC Codes:
- UPSC - TForce WorldWide (UPS Freight)
- TFWW - TForce WorldWide
-
Additional carriers as configured
-
Freight-Specific Fields:
- Account numbers for billing
- API credentials (configured by admin)
- Service region coverage
-
Rate quote endpoints
-
Service Levels:
- Standard LTL
- Expedited Freight
- Guaranteed Service
- Time-Definite Options
Using Freight Forwarding
For complete freight forwarding workflow:
:material-truck-loading: Freight Forwarding Guide
Complete guide covering: - Requesting and comparing rate quotes - Understanding freight classes - Booking shipments - Generating and printing BOLs - Tracking shipments - Handling pickups and deliveries - Accessorial services - Cost optimization
Freight Carrier Best Practices
Rate Quote Optimization: - Request quotes from multiple carriers - Compare total cost including accessorials - Consider transit time vs. cost tradeoffs - Use correct freight class to avoid reclassification
Account Management: - Maintain current account numbers - Monitor freight spend by carrier - Negotiate volume discounts - Review carrier performance regularly
Documentation: - Keep BOL copies for minimum 2 years - Maintain proof of delivery records - Document any damage or shortage at delivery - File claims within carrier timeframes
Integration: - Link freight shipments to customer orders - Track freight costs by order - Generate customer freight invoices - Report on freight metrics
Best Practices
Carrier Configuration
- Use Consistent Codes
- Standardize carrier codes across your organization
- Use industry-standard codes when possible
-
Document custom codes
-
Configure Service Levels
- Add all services you regularly use
- Set accurate transit times
-
Configure specific cutoff times per service
-
Set Realistic Cutoffs
- Account for warehouse processing time
- Consider carrier pickup schedules
-
Build in buffer time for peak seasons
-
Document Account Numbers
- Always enter carrier account numbers
- Keep billing information up to date
- Link to contracts if applicable
Operational Best Practices
- Regular Reviews
- Quarterly review of carrier performance
- Update service levels as carriers change offerings
-
Verify cutoff times seasonally
-
Service Level Management
- Remove unused service levels
- Ensure default service is most commonly used
-
Test new services before making them default
-
SCAC Code Accuracy
- Essential for freight and EDI transactions
- Verify codes with carrier documentation
-
Update when carriers merge or rebrand
-
Inactive vs Delete
- Prefer inactivating over deleting
- Preserves historical shipment data
- Allows reactivation if relationship resumes
Data Integrity
- Naming Conventions
- Use full, official carrier names
- Avoid abbreviations in carrier names
-
Save abbreviations for carrier codes
-
Service Level Naming
- Use carrier's official service names
- Include carrier name in service level
-
Example: "FedEx Ground" not just "Ground"
-
Minimum Order Values
- Update as carrier contracts change
- Document exceptions or special rates
- Set to 0 if no minimum applies
Troubleshooting
Common Issues
Carrier Not Appearing in Shipment Creation
Problem: Configured carrier doesn't show in dropdown
Solutions: 1. Check carrier status - must be Active 2. Verify at least one service level is configured 3. Ensure service levels are also Active 4. Confirm user has permission to use this carrier
Service Level Cutoff Times Not Working
Problem: Orders submitted before cutoff not making pickup
Solutions: 1. Verify cutoff time is set correctly (24-hour format) 2. Check timezone settings in system configuration 3. Confirm pickup schedule includes current day 4. Review carrier-specific cutoff vs service-specific cutoff
Cannot Delete Carrier
Problem: Delete button is disabled or error occurs
Solutions: 1. Check if carrier has active shipments 2. Verify you have admin permissions 3. Instead of deleting, set carrier to Inactive 4. Contact system administrator if delete is required
SCAC Code Validation Errors
Problem: System rejects entered SCAC code
Solutions: 1. SCAC must be 2-4 characters 2. Only uppercase letters and numbers allowed 3. Verify code with carrier documentation 4. Leave blank if carrier doesn't have SCAC
Duplicate Carrier Code Error
Problem: Cannot create carrier with desired code
Solutions: 1. Carrier codes must be unique system-wide 2. Check existing carriers for conflicts 3. Use variation (e.g., UPSFREIGHT vs UPS) 4. Edit or delete conflicting carrier if obsolete
Error Messages
| Error | Cause | Resolution |
|---|---|---|
| "Carrier code already exists" | Duplicate code | Use different code or edit existing carrier |
| "Default service level required" | Missing required field | Enter a default service level |
| "Invalid SCAC code format" | Format validation | Use 2-4 uppercase alphanumeric characters |
| "Cannot delete carrier with active shipments" | Carrier in use | Inactivate instead of deleting |
| "Cutoff time must be valid 24-hour time" | Invalid time format | Use HH:MM format (00:00 to 23:59) |
Getting Help
If you encounter issues not covered here:
- Check System Logs: Review error details in system logs
- Verify Permissions: Ensure you have Carrier Management permission
- Test with Different Carrier: Isolate whether issue is carrier-specific
- Contact Support: Provide carrier details and error messages
- Documentation: Reference API documentation for integration issues
Related Topics
- Shipping & Logistics - Shipment creation and management
- Settings - Carrier integration configuration
- Receiving Operations - Inbound carrier management
Support
For carrier-related questions or issues:
- Email: support@zoratech.io
- Documentation: Troubleshooting Guide
- FAQ: Frequently Asked Questions