Managing receiving orders
Create, review, and track the receiving orders that inbound shipments are processed against.
Which receiving page do I want?
This page covers setting up and tracking receiving orders: creating an order, importing from a purchase order, reading order details and statuses, and understanding who is allowed to do what.
To process a shipment on the floor — scanning products in, capturing serial and lot numbers, completing the receipt, and putaway — see the Receiving shipments SOP.
Before you begin
You need access to the Receiving page. Starting a receipt and cancelling an order may need extra permissions — ask your administrator if a button is missing.
What a receiving order is
A receiving order is the record an inbound shipment is checked in against. It names the warehouse, the products and quantities you expect, and the carrier and equipment bringing them. As staff receive against it, it fills up with what actually arrived.
Opening the receiving page
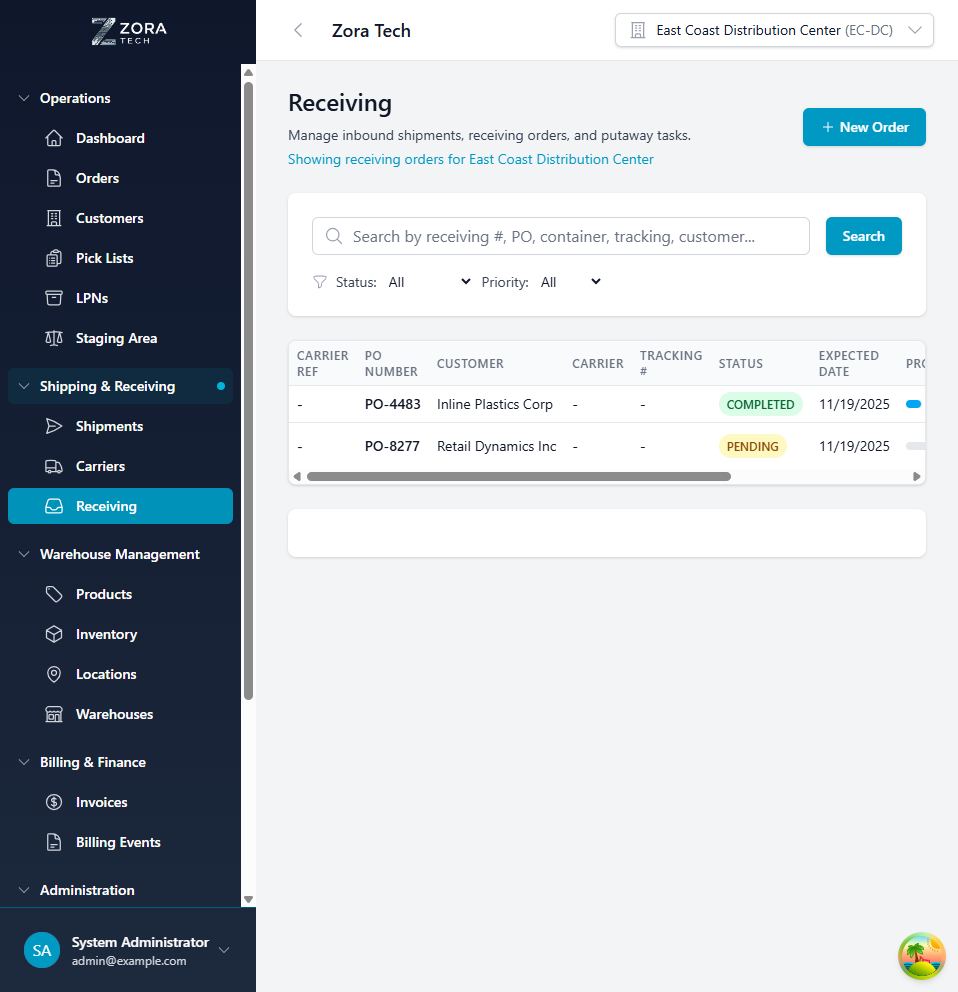
In the sidebar, open Shipping & Receiving → Receiving.
The page lists every receiving order for the warehouse you are working in. Choose New Order to create one.
Finding an order
| Tool | What it does |
|---|---|
| Search | Finds orders by receiving number, PO, container, tracking number, or customer |
| Status filter | Narrows to Pending, In Progress, Completed, or Cancelled |
| Priority filter | Narrows to Low, Normal, High, or Urgent |
| Column headers | Click to sort by PO number, customer, carrier, or status |
The list only shows the warehouse selected in the header.
What each row shows
| Column | Contents |
|---|---|
| Carrier Reference | The truck, trailer, or container |
| PO Number | Your purchase order reference |
| Customer | The supplier or customer sending the stock |
| Carrier | Who is bringing it |
| Tracking Number | The carrier's tracking number |
| Status | A color-coded badge for where the receipt has got to |
| Expected Date | When it's due |
| Progress | How much has been received against what was expected |
Creating a receiving order
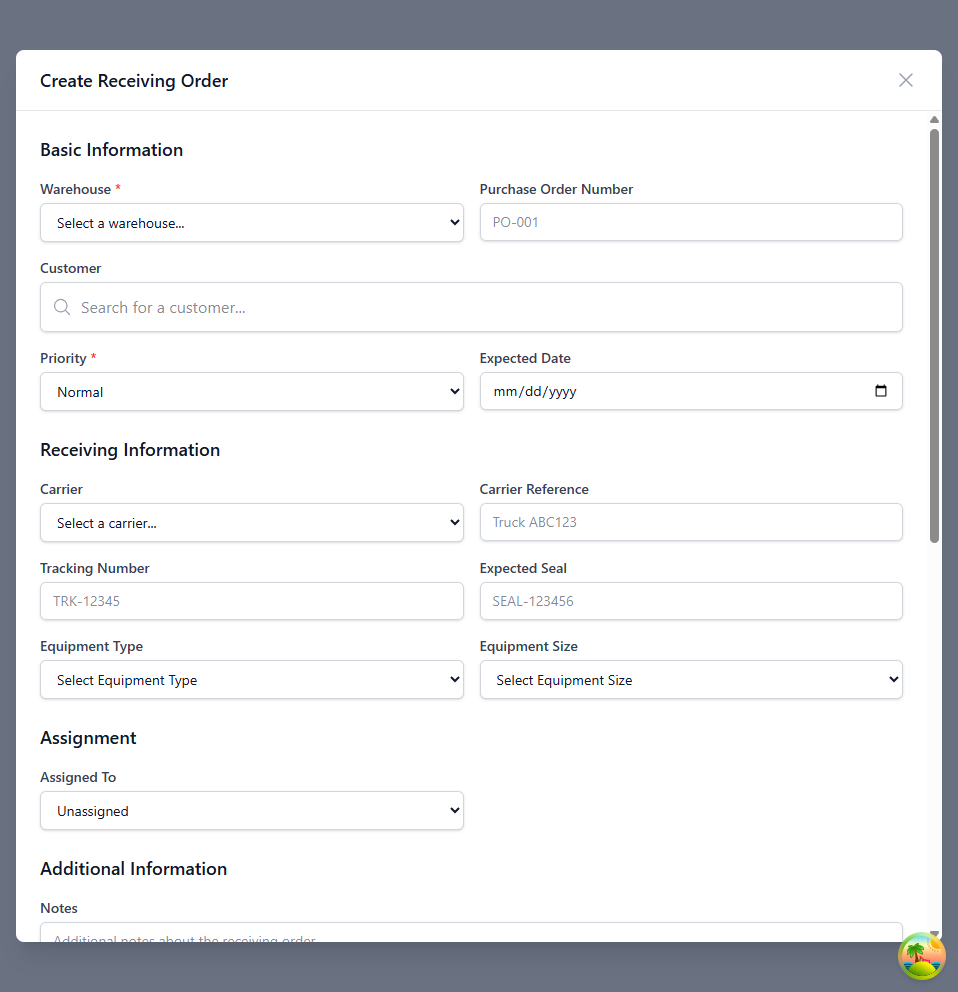
On the Receiving page, choose New Order.
1. Fill in the basics
| Field | Required | What it's for |
|---|---|---|
| Warehouse | Yes | Where the stock will land. Sets which locations are available for putaway. |
| Priority | Yes | LOW, NORMAL, HIGH, or URGENT. Keep URGENT for shipments that really are. |
| Purchase Order Number | No | Your PO reference, for reconciling expected against actual. |
| Customer | No | The supplier or customer the stock belongs to. |
| Expected Date | No | When the truck is due. Used for dock planning. |
2. Add the carrier and equipment details
| Field | What it's for |
|---|---|
| Carrier | Who is bringing the shipment |
| Carrier Reference | Truck number, trailer ID, or container number |
| Tracking Number | The carrier's tracking number |
| Expected Seal | The security seal number the shipper gave you, checked on arrival |
| Equipment Type | Trailer, Container, Flatbed, Flat Rack, Lowboy, or Chassis |
| Equipment Size | 20', 40', 45', or 53' |
All of these are optional, but the seal number and carrier reference are worth entering — they are what you check against when the truck turns up.
3. Assign it and add notes
Assigned To hands the order to a particular clerk. Notes is where you put handling instructions, expected discrepancies, or anything specific to this customer.
4. Add the line items
Search for each product by name, SKU, or barcode, then set the Expected Quantity. That quantity is what receiving progress and variance are measured against.
Each line also takes these optional fields:
| Field | Use it for |
|---|---|
| Unit Cost | Valuing the stock. Updates the product cost on receipt. |
| Unit Weight | Pounds per unit, for checking freight totals. |
| Lot Number | Required for lot-tracked products. |
| Serial Number | Required for serial-tracked products. One serial per unit. |
| Expiration Date | Required for perishables. Drives FEFO allocation later. |
| Notes | Handling, quality, or storage instructions for this line only. |
5. Create it
Check the details, make sure there is at least one line item, then choose Create Receiving Order.
The platform checks the required fields, generates a receiving order number, sets the status to Pending, and returns you to the list.
Creating orders in bulk
Rather than entering orders one at a time, you can create them from a file:
- Upload a spreadsheet to create many receiving orders and their lines at once.
- Download a pre-formatted template so your columns match what the importer expects.
- Import from a source document. Receiving orders are the only entity type that supports this, rather than needing a structured spreadsheet.
See Bulk upload for the procedure, validation, and error handling.
No ERP or ASN integration
Receiving orders are created by hand or by bulk import. The platform does not connect to external ERP systems and does not consume supplier ASN (Advance Shipment Notice) feeds. Purchase Order Number is a reference you type in, not a live link to a PO system.
Reading a receiving order
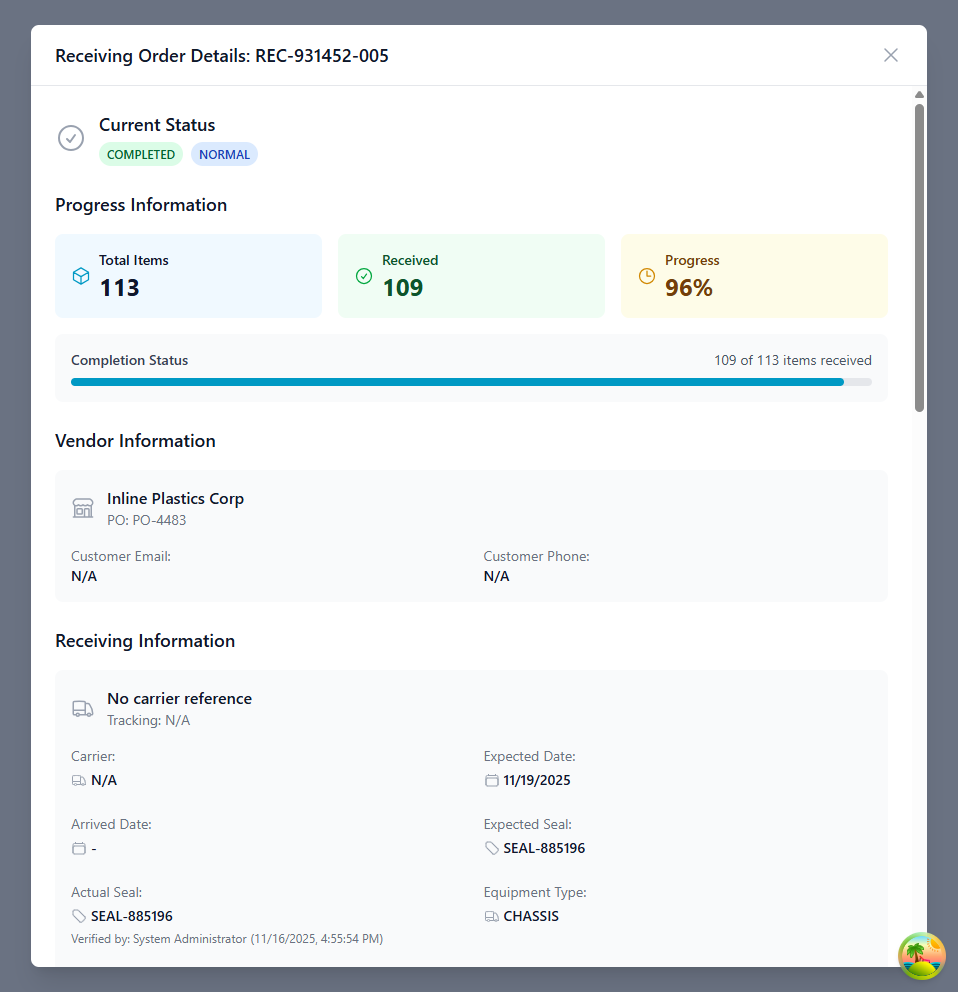
Click any row on the Receiving page to open the order. It is grouped into sections:
| Section | What you'll find |
|---|---|
| Current status | Status and priority badges, plus the buttons available now — Receive, Edit, Delete, Cancel |
| Progress | Expected total, received total, a percentage bar, and over/under indicators |
| Vendor | Customer or supplier name, PO number, contact email and phone |
| Receiving | Carrier, carrier reference, tracking number, expected and actual arrival, expected and actual seal, who verified the seal, equipment type and size |
| Assignment | Who created it, who owns it now, and how that has changed |
| Notes | Order notes and special instructions |
| Line items | Per line: product, SKU, expected and received quantity, variance, who received it, line status, and any lot or serial numbers |
| Putaway tasks | Task number, quantity, from and to location, status, and who it's assigned to |
| Documents | Attached BOLs, packing slips, and photos |
| Change history | Every status change and field edit, with who and when |
Edit is only available while the order is Pending.
Delete and Cancel are not the same
Cancel keeps the order and its history — use it when a shipment isn't coming. Delete removes the record permanently.
Receiving a shipment
When the truck arrives
- Check the carrier reference and equipment type against the order.
- Inspect the seal and record its number.
- Check the paperwork — bill of lading (BOL) and packing slip.
- Open the receiving order, which records the arrival time.
Verifying the seal
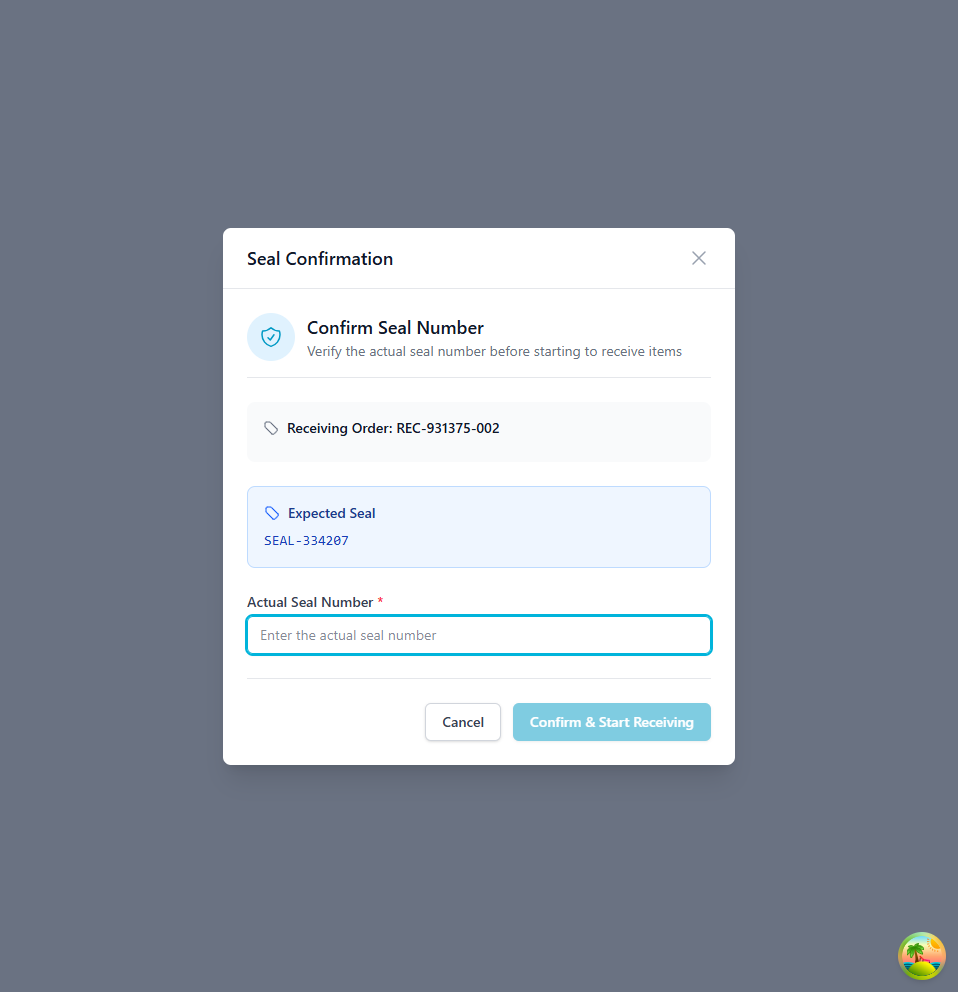
-
Choose Receive on a pending order.
The expected seal number from the order appears.
-
Inspect the seal physically on the shipment.
- Enter the actual seal number.
-
Choose Confirm & Start Receiving.
The order moves to In Progress.
Stop if the seal doesn't match
A seal number that differs from the expected one, or a seal that is broken, means the load may have been opened in transit. Record what you see, tell your supervisor, and don't unload until someone has looked at it.
Choosing how to receive
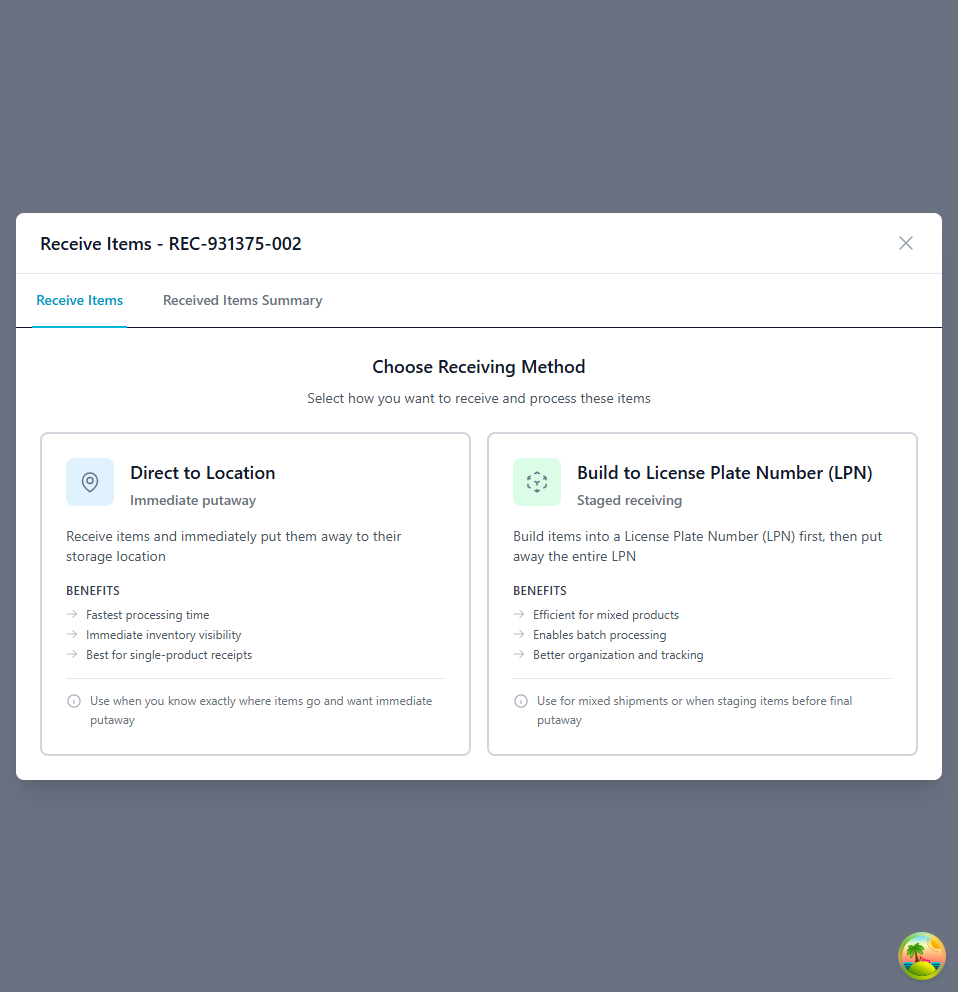
| Method | Use it when | What happens |
|---|---|---|
| Direct to Location | The shipment is one product and you know where it goes | You receive and put away in one step. Fastest, and stock shows up immediately. |
| Build to LPN | The load is mixed, or several products share a pallet | You build the items onto a License Plate Number (LPN), then put the whole LPN away as one unit. |
Checking the products in
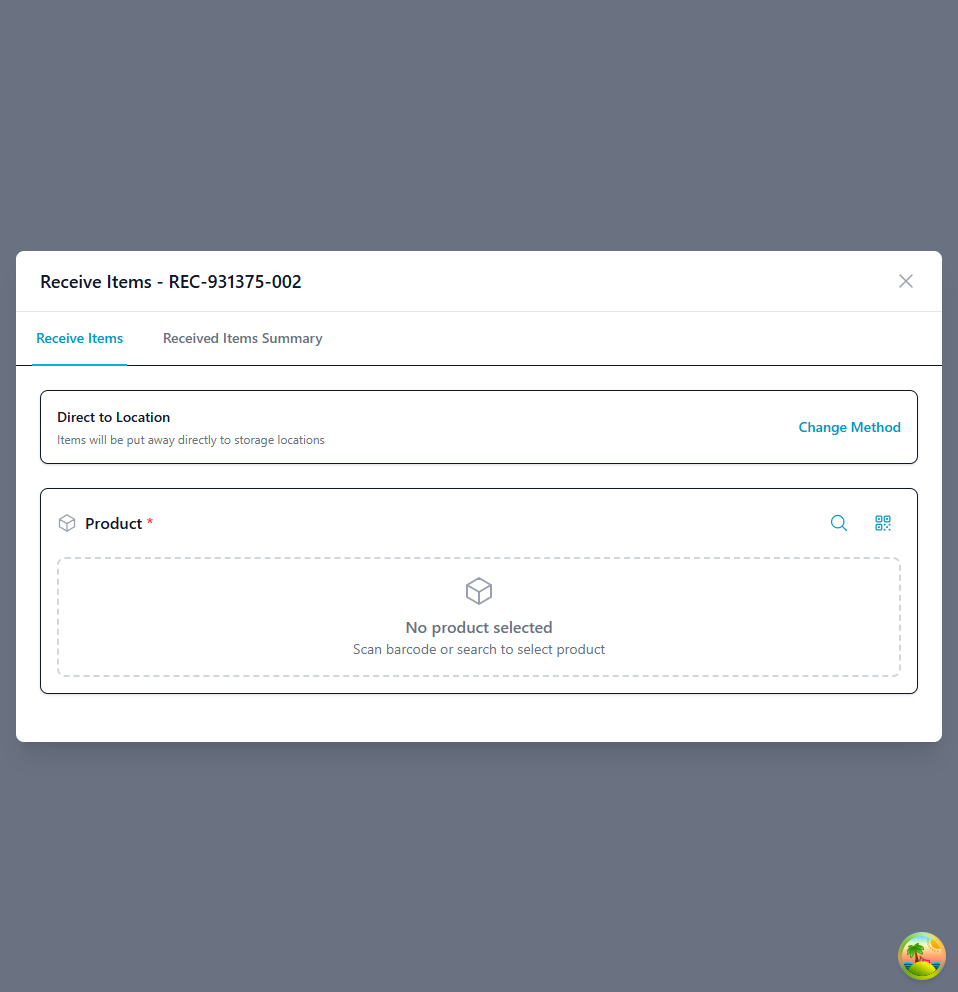
- Scan each product barcode, or search by SKU.
- Enter the quantity that actually arrived and compare it to what was expected.
- Record any shortage, overage, or damage as you find it — not afterwards.
- Look the stock over for damage, check the packaging, and confirm lot numbers and expiry dates.
- Capture serial numbers for any serial-tracked products.
- Assign a storage location (Direct to Location) or build the items onto an LPN (Build to LPN).
-
Confirm the receipt.
Line item statuses update, putaway tasks are generated, and stock levels go up. The order moves to Completed.
Receiving something you weren't expecting
Stock always has to be checked in against a receiving order, so a shipment that turns up unannounced needs one creating before you can receive it.
- Create a receiving order for what has arrived, naming the supplier.
- Add the products and the quantities you can see.
- Receive against it as normal.
- Tell your supervisor the shipment arrived without notice, so the paperwork can be chased.
Sending stock straight back out
Some stock never needs putting away. If it is already spoken for, you can route it from the inbound dock to an outbound shipment instead of storing it first:
| Approach | What happens |
|---|---|
| Cross-dock | Straight from inbound to outbound, with no putaway step |
| Transload | The same idea, but the stock waits in a staging area in between |
Spot the candidates during check-in, so the stock goes to the right place the first time rather than being put away and picked again an hour later.
Receiving order statuses
| Status | Means |
|---|---|
| Pending | Created, waiting for the shipment to arrive |
| In Progress | Receipt started, items being checked in |
| Completed | Everything received, ready for putaway |
| Cancelled | Cancelled — the shipment isn't coming |
Statuses change as you work; you don't set them by hand:
| When you… | The order becomes |
|---|---|
| Create it | Pending |
| Start receiving | In Progress |
| Receive everything | Completed |
| Cancel it | Cancelled |
Tracked products, containers, and discrepancies
These come up while a shipment is being received. The step-by-step instructions live with the floor procedure — this section is what an order manager needs to know about them.
Serial and lot tracked products
Products set up for serial or lot tracking need their identifiers captured as the shipment is received. Serial numbers are checked for uniqueness. Lot numbers carry an optional expiry date, which drives FEFO allocation later.
One receiving order can record several lots of the same product, each with its own quantity and expiry date.
For the capture procedure, see Receiving shipments — handle serial and lot tracked items. For the full lifecycle, see Serial and lot tracking.
LPN receiving
Stock can be received onto License Plate Numbers — containers or pallets that hold several products and move as one unit through putaway and picking.
See LPN container management for building and managing containers, and Receiving shipments — putaway for putting an LPN away.
Discrepancies
When what arrives doesn't match what was expected, the receipt records a discrepancy against the order:
| Type | Meaning |
|---|---|
| Shortage | Fewer units arrived than expected |
| Overage | More units arrived than expected |
| Damage | Units arrived damaged |
You can attach photos to a discrepancy, so the evidence sits on the receiving order instead of on someone's phone.
Discrepancies are recorded, not settled
The platform captures shortages, overages, and damage against the receiving order. It has no supplier claims or dispute workflow — pursuing a claim with the carrier or supplier happens outside the platform, using the recorded discrepancy and its photos as evidence.
Quality control locations
Warehouses can define locations typed as Quality Control. Stock put there is left out of automatic allocation, so it won't be picked for an order until someone moves it. You can still allocate from it by hand when you mean to.
This is a location type, not a guided inspection workflow — there is no inspection checklist and no accept/reject step in the platform. See Location management.
Getting it right
Before the truck arrives, create the receiving orders ahead of time (use bulk import if there are many), agree arrival times with the carrier, make sure staff and equipment are free, and check whether anything on the load is hazmat, temperature-sensitive, or fragile.
While you're receiving, always check and record the seal number, scan rather than counting by eye, record discrepancies the moment you find them, and photograph any damage.
On quality, spot-check a representative sample rather than everything, confirm expiry dates leave enough shelf life, look for packaging damage, and move anything questionable to a Quarantine location so it can't be picked.
On putaway, group similar items into one trip, and put fast-moving stock where it's easy to reach.
Troubleshooting
| Problem | What to do |
|---|---|
| "Warehouse required" when creating an order | Choose a warehouse from the dropdown before submitting. |
| Product not found while receiving | Check the product exists and is active, and that the barcode is linked to it. Search by SKU or name instead. |
| Seal number doesn't match | Record the actual number, tell your supervisor, and check with the carrier before unloading. |
| Order stuck in In Progress | Open the line items and see what's outstanding. Receive or cancel the remaining lines. |
| Putaway tasks won't generate | Check every line item is received and that the warehouse has locations available. Refresh and try again. |
| Serial number won't validate | Check the format matches the product's configuration, and that the serial hasn't already been received. Contact your administrator if the rules need changing. |
Still stuck? Contact your warehouse supervisor or receiving manager with the receiving order number and the exact error message.
Things worth knowing
- A receiving order belongs to one warehouse and can't be moved. Stock lands in that warehouse, and putaway tasks are generated there.
- Creating an order needs standard user permissions. Running a receipt needs warehouse operator permissions, and cancelling may need a supervisor.
- Receiving orders update live across every session, and stock levels rise the moment a receipt completes.
- Putaway tasks are generated automatically when receiving finishes.
Related guides
- Receiving shipments SOP - Processing a shipment on the floor, step by step
- Mobile receiving workflow - Receiving on a phone
- Bulk upload - Creating receiving orders in bulk
- Serial and lot tracking - How tracked products behave end to end
- LPN container management - Building and moving containers
- Inventory management - Where stock goes once it's received