Shipping and outbound operations
Move an order out the door: create a shipment, load its LPNs by scanning, manifest it with a carrier, generate labels and documents, dispatch it, and track it to delivery — all from the Shipments page.
Which shipping page do I want?
This page is the desk work on the Shipments page, from creating the shipment to tracking it to the door.
To pack picked stock at the staging area and print its label, see Packing and shipping.
Quick info
Audience: Dispatchers, Warehouse Supervisors, Carrier Coordinators Route: /shipments Mobile: Loading workflow supported on mobile Related: Packing & shipping SOP | Load planning | Order processing
Before you begin
You need access to the Shipments page. Some actions — a supervisor override, for example — need the shipment:update permission; ask your administrator if a button is missing.
A shipment links one or more orders, their LPNs, a carrier, and the tracking documents. It moves through a fixed set of statuses from planning to delivery, with every step written to the shipment's own audit log.
Shipment lifecycle
A shipment moves through these statuses, tied to what's happening with the carrier:
stateDiagram-v2
    [*] --> PLANNED: Create
    PLANNED --> LOADING: Start loading session
    LOADING --> PLANNED: Abort loading
    LOADING --> MANIFEST: Complete loading + manifest
    PLANNED --> MANIFEST: Manifest directly
    MANIFEST --> DISPATCHED: Dispatch
    DISPATCHED --> IN_TRANSIT: Carrier tracking
    IN_TRANSIT --> DELIVERED: Proof of delivery
    PLANNED --> CANCELLED: Cancel
    LOADING --> CANCELLED: Cancel
MANIFEST --> CANCELLED: Cancel| Status | Description |
|---|---|
| PLANNED | Shipment created; orders and LPNs may be attached but not yet loaded |
| LOADING | Active loading session — LPNs being scanned onto the shipment |
| MANIFEST | Loading complete; manifest generated and ready for carrier pickup |
| DISPATCHED | Carrier has picked up the shipment |
| IN_TRANSIT | Shipment moving through carrier network |
| DELIVERED | Proof of delivery recorded |
| CANCELLED | Shipment voided; orders returned to READY_TO_SHIP, LPNs returned to AT_STAGING |
Cancellable statuses
Only shipments in PLANNED, LOADING, or MANIFEST status can be cancelled. Once DISPATCHED, a shipment must be resolved through carrier channels.
The shipments list page
Go to Shipments in the sidebar to open the list view at /shipments.
Filters
The list supports filters with bracket notation. Filter state is persisted to the URL, so any view you create can be shared, bookmarked, or reopened with a browser refresh.
| Filter | Operators | Example |
|---|---|---|
| Status | eq, ne, in, notIn | status[in]=PLANNED,LOADING |
| Carrier | eq, ne | carrierId[eq]=<uuid> |
| Customer | eq, ne | customerId[ne]=<uuid> |
| Warehouse | equals | warehouseId=<uuid> |
| Date range | startDate, endDate | startDate=2026-04-01&endDate=2026-04-18 |
| Search | free text | search=SHP-001 — matches shipment number, tracking, BOL, MBOL |
The legacy ?status=PLANNED format is still honored and treated as eq. By default the list excludes DELIVERED shipments to keep the active workload front-and-center; toggle the Show delivered filter to include them.
URL filter persistence
Any combination of filters you apply is reflected in the URL. Bookmark frequent views — for example, all MANIFEST shipments for a specific carrier ready for same-day pickup — and share the link with teammates.
Statuses at a glance
The list color-codes each shipment by status:
| Status | Color |
|---|---|
| PLANNED | Neutral |
| LOADING | Blue |
| MANIFEST | Amber |
| DISPATCHED / IN_TRANSIT | Teal |
| DELIVERED | Green |
| CANCELLED | Gray |
Bulk actions
Select rows with the checkboxes to act on several shipments at once:
| Action | What it does |
|---|---|
| Bulk assign carrier | Sets a single carrier across every selected shipment |
| Bulk manifest | Generates manifests for every eligible selected shipment |
| Bulk export | Downloads a CSV of the current selection |
| Bulk cancel | Cancels the selected shipments — still only for those in PLANNED, LOADING, or MANIFEST |
Bulk cancel caveat
Bulk cancel is atomic per shipment, not across the batch. If one shipment fails the eligibility check, the rest still process. Check the results panel for any skipped entries.
Creating a shipment
From the shipments list
- Choose Create Shipment on the Shipments page.
- Choose a creation mode:
- From orders — pick one or more
READY_TO_SHIPorders - From staging — consolidate LPNs already sitting in a staging area
- Empty — create a shell shipment and add orders or LPNs later
- From orders — pick one or more
-
Enter the shipment details:
- Customer — auto-filled when created from orders
- Origin — a warehouse location or a party address
- Destination — the customer's address, or another warehouse
- Carrier — optional at creation; you can assign it later
- Requested pickup date
Zora generates a shipment number (
SHP-XXXX) automatically, and the shipment opens inPLANNEDstatus.
API: POST /shipments — create from orders; POST /shipments/from-staging — create from a staging area consolidation.
From an order detail page
On an order in READY_TO_SHIP status, choose Add to Shipment to either create a new shipment with this order, or attach it to an existing PLANNED shipment for the same customer.
Adding orders to an existing shipment
From a shipment detail page, choose Add Orders and select the orders to attach.
API: PUT /shipments/:id/orders — body { orderIds: string[], force?: boolean }.
Customer mismatch confirmation (v1.6)
If any selected order belongs to a different customer than the shipment, Zora blocks it and shows a customer-mismatch confirmation dialog listing every mismatched order and its customer. Choose Confirm and Add Anyway to proceed anyway, or Cancel and remove the mismatched orders from your selection.
Mis-consolidation into the wrong customer's shipment is the most common cause of mis-shipments. This dialog exists to stop that error at the warehouse before labels print.
Delivery stops
A shipment carrying orders for more than one consignee makes more than one stop. Each stop is a stored record on the shipment rather than something recomputed from addresses every time the page opens, and you set the order the driver visits them in. That sequence is what the bills of lading number themselves against, so it is the route the paperwork describes.
Open a shipment and look at the Orders tab: Delivery Stops sits above the order cards, one numbered row per stop, showing the consignee, how many orders and LPNs are on it, and the BOL revision once one has been issued.
How stops are built
Stops reconcile automatically whenever orders join or leave the shipment:
- An order you have already placed on a stop keeps it. Your assignment wins and is never re-derived from the address.
- A newly attached order is grouped by consignee — the same rule the bill of lading uses — and joins the stop its group already sits on, or a new stop appended at the end.
- A shipment with an explicit destination set on it is a single stop, whatever the orders say.
- A stop left with no orders is removed, unless a bill of lading was already issued for it.
Orders converted from a multi-stop delivery request arrive in the sequence the customer asked for.
Reordering stops and moving orders
While the shipment is PLANNED or LOADING:
| To do this | Use |
|---|---|
| Change the visiting order | The up and down arrows on a stop row — PATCH /shipments/:id/stops/reorder |
| Move an order to another stop | The stop selector on that order's card, below it in the same tab — PATCH /shipments/:id/orders/:orderId/stop |
| Give an order a stop of its own | New stop… in that same selector, which moves the order onto a new stop at the end of the sequence |
Once the shipment is manifested neither orders nor stops can change, and the section says so instead of offering the controls.
Stops still move after the paperwork exists
Completing a loading session issues every stop's bill of lading, but that does not freeze the route — a driver's run can still be resequenced afterwards. When BOLs exist the section warns you before you act, and a reorder or a reassignment then files a new revision of each stop whose position or orders changed. Earlier revisions stay on record and issued BOL numbers never change.
If a revision cannot be filed, that stop is named back to you so you can issue it by hand from the BOL editor.
A stop emptied after its BOL was issued is kept, not deleted
Move every order off a stop that already has an issued bill of lading and the stop stays on the list, badged Superseded, with its move controls gone. The signed document has to stay reachable, so the stop is retired rather than removed.
LPN-to-shipment loading workflow
Loading is the scan-driven process of moving picked LPNs from staging onto a specific shipment. It runs as a loading session with real-time validation, barcode verification, and optional supervisor overrides.
Starting a loading session
-
Open the target shipment and choose Start Loading.
Zora creates a loading session, locks the shipment against concurrent edits, and moves it to
LOADINGstatus.
The loading dashboard shows the expected LPNs (from attached orders and any pre-added LPNs), the loaded count against the total, weight and cube progress, and the session event log.
API: POST /shipments/:id/loading/start.
One active session per shipment
A shipment can only have one active loading session at a time. If another user tries to start one on the same shipment, Zora blocks it. Use GET /loading-sessions/active to see your in-progress sessions across all shipments.
Scanning LPNs
-
Scan the LPN label with the barcode scanner.
Zora checks that the LPN exists and is in the current warehouse, that its status is
AT_STAGINGor otherwise loadable, that its contents belong to the shipment's customer, and that it isn't already loaded on another active shipment.
The scan comes back at one of three levels:
| Result | Means |
|---|---|
| Success | LPN loaded; the progress counter advances |
| Warning | Loaded, but with a caveat — a different pick list, an expiring lot, and so on |
| Error | Rejected with a reason code; the LPN is not loaded |
API: POST /shipments/:id/loading/scan-lpn.
Customer mismatch during loading (v1.6)
If a scanned LPN's contents belong to a different customer than the shipment, the scan is blocked with an error. There is no "force-load" path from the scanner — this is deliberate. LPNs belonging to the wrong customer must be returned to staging and routed to the correct shipment.
No override for customer mismatch
Unlike the order-to-shipment confirmation dialog, the loading workflow does not allow overriding a customer mismatch. The correct remediation is to remove the LPN from the scan list and resolve the allocation upstream (pick list, order linkage).
Checking an LPN before loading it
To confirm an LPN is loadable before committing it, call POST /shipments/:id/loading/validate-lpn. It runs the same checks as a real scan, but doesn't load anything.
Removing an LPN from an active session
If you loaded an LPN by mistake, choose Remove next to its row in the session.
The LPN returns to AT_STAGING status and drops out of the session counters.
API: DELETE /shipments/:shipmentId/loading/lpn/:lpnId with { reason }.
Completing the loading session
-
Once the counter reads complete — every expected LPN scanned — choose Complete Loading.
The session closes and the shipment moves out of
LOADING, ready for manifest. Zora issues a bill of lading automatically against the finished load, one per delivery stop, and offers you signature capture on the same device — see Bill of lading.
API: POST /shipments/:id/loading/complete.
Supervisor override for partial loads
If a shipment has to ship short — a missing LPN, damaged goods pulled off the truck — a user with the shipment:update permission can complete the session with a supervisor override.
- Choose Complete with Override.
- Enter a reason. It's required, and it's written to the audit log.
- Confirm.
API: POST /shipments/:id/loading/supervisor-override with { action: 'complete_partial', reason }.
Write a reason someone else can use
Use plain language — "missing LPN ABC123, still at customer staging, next truck" — rather than a code. The customer service team reads the audit trail when they need to follow up.
Aborting a session
To cancel a loading session without saving progress, choose Abort Loading. Every scanned LPN returns to AT_STAGING and the shipment reverts to PLANNED.
API: DELETE /shipments/:id/loading/abort with { reason }.
Carrier assignment and booking
Assigning a carrier
You can assign a carrier at creation, or any time before manifest.
- Open the shipment and choose Assign Carrier.
- Select the carrier from the dropdown — carriers are configured in Administration → Carriers.
- Select a service level (Ground, Express, LTL, and so on — pulled from the carrier's configured services).
- Enter a carrier reference number if the booking was made externally. Optional.
API: PUT /shipments/:id/tracking.
Booking / manifesting
Once loading is complete and a carrier is assigned, generate the manifest to mark the shipment ready for carrier pickup.
- Choose Preview Manifest to review the aggregated LPN contents.
- Check the totals — weight, cube, piece count, declared value.
-
Choose Manifest Shipment.
You can also enter a Manifest number (Zora generates one if you leave it blank), a Carrier reference (the carrier's internal booking ID), and a Bill of lading number for LTL or freight shipments.
The shipment moves to
MANIFESTstatus, every LPN on it moves toSHIPPEDand clears out of staging, and the shipment is ready for carrier pickup.
API: GET /shipments/:id/manifest-preview, POST /shipments/:id/manifest.
Manifest vs. dispatch
Manifest means the paperwork is complete and the shipment is ready for pickup. Dispatch means the carrier has physically picked it up. A shipment can sit in MANIFEST for hours or days until the carrier arrives.
Dispatch
When the carrier picks up:
- Choose Dispatch on the shipment detail page.
-
Enter or confirm the Tracking number (pre-filled if one is already set), the Actual pickup date/time (defaults to now), and any Notes.
The shipment and every attached LPN move to
DISPATCHED.
API: POST /shipments/:id/dispatch.
Labels and manifests
Shipping labels
Labels come from the Fabric.js template editor, a drag-and-drop designer for carrier-compliant labels, BOLs, packing slips, and custom forms.
- From the shipment detail page, choose Generate Label.
- Select a template, or design one in Administration → Templates.
- Preview the rendered label — its fields (tracking number, addresses, barcode, LPN counts, weight, customer PO, and so on) are already bound to the shipment's data.
- Choose Print or Download PDF.
Templates are reusable across shipments. Zora ships with:
- A 4×6 shipping label (ZPL-friendly, barcode-first)
- A letter-size packing slip with itemized contents
- A BOL / Straight Bill of Lading for LTL
- Custom carrier-specific labels
The template editor is documented separately
This page only covers generating a label for a specific shipment from an existing template. The editor itself is documented in Administration → Templates.
The shipment's BOL doesn't come from the template editor
A shipment's Bill of Lading comes from the customer-supplied VICS Uniform Straight Bill of Lading form, populated from shipment data — it isn't a Fabric.js template. See Bill of lading below.
Manifests
The manifest is one document covering every LPN and line item on the shipment. Generate it with Manifest Shipment — see Booking / manifesting above.
Download it as a PDF from the shipment detail page; Zora also attaches it to the shipment's document list automatically.
Shipment documents
Zora files issued and signed BOL revisions here automatically — see Bill of lading. Upload anything else (customs paperwork, inspection reports, carrier-supplied copies) from the Documents tab.
Documents are scoped to the shipment's customer, so they're visible in billing and the customer portal too.
API: GET /shipments/:id/documents (list), POST /shipments/:id/documents (upload, multipart), GET /shipments/:id/documents/:docId/download, DELETE /shipments/:id/documents/:docId.
Bill of lading
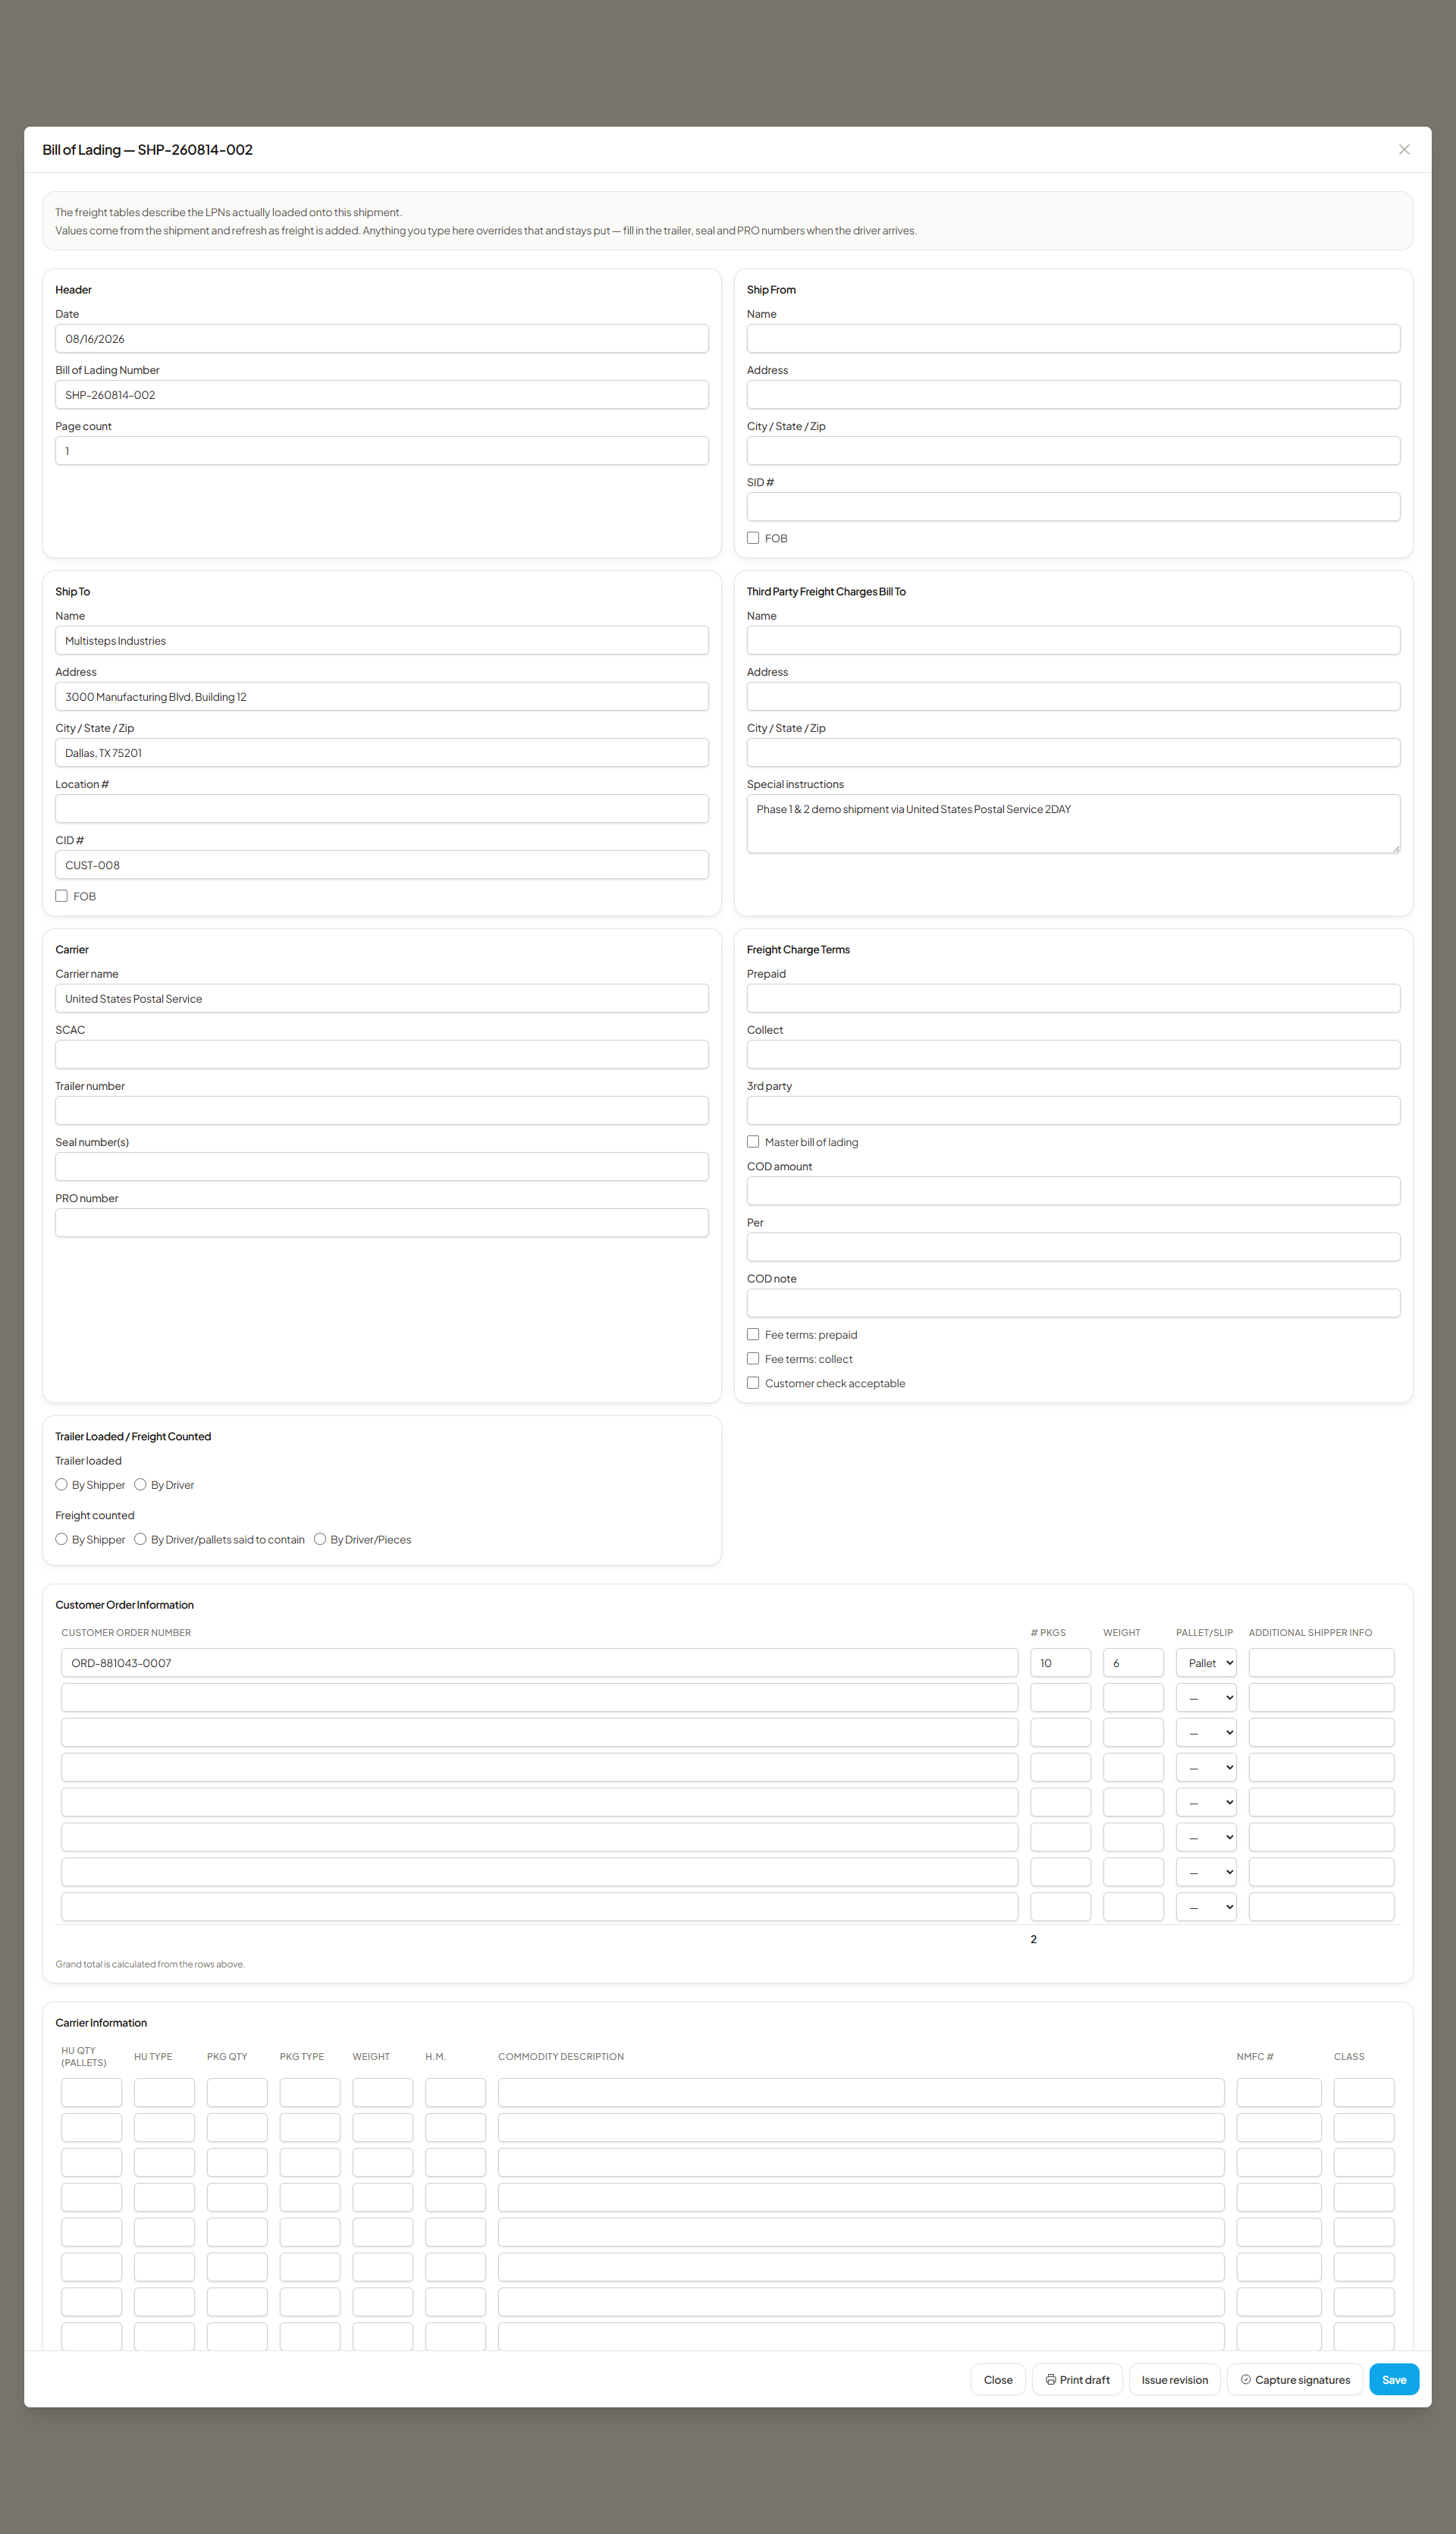
Every shipment has a VICS Uniform Straight Bill of Lading that the platform builds from the shipment itself. Consignee, carrier, commodity lines, weights, and warehouse branding are read off the shipment and recomputed every time the document is opened, so it tracks the freight as it is added. It exists from shipment creation — trailer, seal, and PRO are blank until someone fills them in.
Open it from the shipment detail page: Documents tab → Open BOL.
Derived values and overrides
The form is derived-plus-override:
- Everything the platform already knows is recomputed from the shipment on every read.
- Anything you type is saved as an override and stays put. A deliberately blank override is kept as a blank rather than falling back to the derived value.
- Each edited field carries a restore control that drops the override and brings the derived value back —
POST /shipments/:id/bol/reset.
Fields are grouped to match the printed form: Header, Ship From, Ship To, Third Party Freight Charges Bill To, Carrier, Freight Charge Terms, and Trailer Loaded / Freight Counted, plus the two freight tables (Customer Order Information and Carrier Information).
Four fields write back to the shipment rather than living only on the BOL, so billing and the dispatch screen keep reading the same values:
| BOL field | Shipment field |
|---|---|
| Bill of Lading Number | Bill of lading number |
| Trailer number | Equipment number |
| Seal number(s) | Seal number |
| PRO number | Tracking number |
Multi-stop loads write back less
On a multi-stop shipment only the trailer number and PRO number write through — there is one truck, whoever it delivers to. BOL number and seal are per-consignee, and the shipment holds a single column for each, so writing them through would surface one stop's seal number on every other stop's document.
Trailer loaded / freight counted
The two attestation boxes at the foot of the form record who did the physical work, and they are the only fields on the BOL that describe the handover rather than the freight. Both are now fillable in the editor and print as ticked boxes:
| Group | Options |
|---|---|
| Trailer loaded | By Shipper · By Driver |
| Freight counted | By Shipper · By Driver/pallets said to contain · By Driver/Pieces |
Each group takes one tick, never two, matching the printed form. Both are left blank on a draft and stay blank until someone sets them — whether the shipper or the driver loaded the trailer is not known until the trailer is loaded, and pre-selecting an answer would put an unverified claim on a document that gets signed.
These boxes used to be printed artwork
On earlier templates the squares were drawn on the page with nothing behind them, so they could not be ticked here or in a PDF reader — operators marked them by hand on the printout. They are real form fields now, so a BOL can leave the platform already attested.
Planned load vs. actual load
Before anything is loaded, the freight tables describe the planned load derived from the order lines. Once LPNs are on the shipment they describe the LPNs actually loaded. The panel above the form states which basis is in play.
The editor raises amber warnings for conditions that would produce bad paperwork, including:
- No consignee resolved — Ship To must be filled in before printing
- No carrier assigned, so carrier name and SCAC are blank
- Hazmat freight on the shipment — confirm proper shipping name, UN number, and emergency contact
- Loaded handling units allocated to no order, so they appear on no bill of lading
- More order or commodity lines than the eight rows the form prints — attach a continuation sheet
Totals describe the load, not the page
When a shipment overflows the eight printed rows, the totals box still covers the whole load, so it reads higher than the printed rows add up to. That is deliberate — the receiver counts pallets off the trailer, not off the page.
Customer order number and additional shipper info
Two columns of the Customer Order Information table are filled from outside the order itself.
Customer order number prints the customer's own purchase order where the platform holds one. The PO is captured on the receiving order the outbound order came from, so it appears on the BOL whenever that link exists. This is the column the consignee reconciles against, and a Zora-generated order number means nothing on their end. Where no PO is on file the column falls back to the platform's order number rather than printing a blank — an unfamiliar reference still beats no reference when someone is matching paperwork to a delivery on a dock.
Additional shipper info prints the distinct lot values on the order, in first-seen order, so a ten-line order of a single lot prints that lot once. The cell is left empty when no line carries a lot.
Lot values print unlabelled, and long lists are capped
The values print bare, with no LOT # or PART # prefix in front of them. Operators use that field differently — some carry a genuine lot code there, others a manufacturer part number — so any prefix the platform printed would be wrong for somebody. There is no setting that adds one.
The printed cell fits roughly 44 characters, and a PDF viewer clips a longer string silently with no ellipsis. Rather than let a lot vanish off the edge of a signed document, the list is capped and the remainder is declared — LOT-4471, LOT-4472 +2 more. A reader who sees +2 more knows to ask.
A failed PO lookup stops the render
If the purchase-order lookup errors, printing fails with a Could not read the customer purchase orders for this shipment message and asks you to try again — it does not quietly fall back to the platform order number. Two revisions of the same freight carrying different customer order numbers, with nothing on either page explaining why, is worse than a retry. "No PO on file" is a stable fact and prints consistently; only a genuine failure blocks.
Multi-stop loads
More than one delivery stop means a multi-stop load, and each consignee gets their own bill of lading, so each signs only for the freight coming off the truck at their dock. A stop selector appears above the form; GET /shipments/:id/bol/stops lists them, and every BOL endpoint accepts an optional ?stop= parameter.
The stops the editor tabs through are the shipment's stored stops, in the order you put them in — the BOL numbers each one against that sequence rather than deriving its own. Reorder a stop after a revision has been issued and the affected documents are re-issued under the new number.
Printing, issuing, and signing
| Action | What it does |
|---|---|
| Print draft | Renders the current values as a fillable PDF without recording a revision — the form fields stay editable so a correction can still be typed in at the dock. GET /shipments/:id/bol/pdf |
| Issue revision | Freezes the current values as a numbered revision and files the rendered PDF under the shipment's documents, so it can be reprinted exactly as issued. POST /shipments/:id/bol/issue |
| Capture signatures | Opens signature pads for the shipper and the driver, then files the signed revision. POST /shipments/:id/bol/sign |
Save first — all three actions are blocked while there are unsaved edits.
Signatures are drawn on the operator's device. Either party can sign alone, but a signature is only included if the matching printed name is filled in. Submitting stamps both marks into their blocks on the form, files the signed PDF under the shipment documents, and records who signed and when.
Issued revisions are frozen; the draft is not
Issued and signed revisions never change. The draft stays editable, and if it is edited after signing the editor flags the drift — the signed copy still stands as accepted. Capture a fresh signature if the driver needs to accept the current values. GET /shipments/:id/bol/revisions lists issued revisions, newest first.
Automatic capture at loading completion
Completing a loading session issues a bill of lading automatically — one per stop — against the finished load, so the filed document describes the freight actually on the truck rather than what was planned. Signature capture is then offered on the same device while the driver is standing there.
That prompt is skippable on purpose: loads are also closed out from the office, where there is no driver to sign, and the BOL stays available on the shipment either way.
A BOL failure never fails the load
If automatic capture fails, loading still completes — the inventory has already moved by that point. The failure is logged and the BOL remains available on demand; nothing is lost but the automatic copy.
Tracking
Viewing tracking
The shipment detail page shows a Tracking panel with:
- Current carrier tracking number
- Bill of lading / MBOL / seal / equipment numbers
- Event history from the carrier (when carrier integration is enabled)
- Estimated delivery date
Updating tracking fields
Set or update any of these at any point, from the tracking editor: Tracking number, Bill of lading number (BOL), Master bill of lading number (MBOL) for consolidated freight, Carrier reference, Seal number, Equipment number (trailer or container), and Notes.
API: PUT /shipments/:id/tracking.
MBOL for consolidated freight
Use MBOL (Master BOL) when multiple shipments roll up under a single freight-forwarder move. The individual shipment's BOL is the "house" BOL; the MBOL ties it to the consolidated move. Set both if this shipment is part of a larger consolidation.
Status updates
You can move a status manually from the detail page (Mark Delivered, Mark In Transit), or Zora updates it automatically from carrier tracking webhooks when that integration is configured. Every change is recorded in the shipment audit log — your user ID for a manual change, the webhook source for an automatic one.
Shipment audit log (v1.6)
Every shipment has an audit log, on its own Audit Log tab on the shipment detail page.
What's recorded
- Shipment creation, updates, cancellation
- Order attach/detach events (including any customer-mismatch force-add with the user who confirmed)
- LPN add/remove events
- Loading session start, scan, complete, abort, supervisor override
- Manifest, dispatch, tracking updates
- Document upload/delete
- Status transitions (with prior and new status)
Each entry captures who (user ID and display name), when (ISO-8601 timestamp), what (action type), and details (JSON payload with diff and metadata).
Filtering
The audit log view supports filters by:
- Action type (e.g. only show
loading-session.*events) - User
- Date range
Exporting
Choose Export Audit Log to download a CSV of the currently filtered entries — useful for compliance reporting and customer dispute resolution.
New in v1.6
The per-shipment audit log UI was introduced in v1.6 as part of the mis-shipment investigation work. It surfaces the same data that was previously only accessible via backend queries, now with filtering and export built into the shipment detail page.
Cancellation
Cancelling a shipment rolls back every downstream effect atomically. It is only allowed for shipments in PLANNED, LOADING, or MANIFEST status.
What happens on cancel
- Any active loading session is auto-aborted
- All attached orders are returned to
READY_TO_SHIPstatus - All attached LPNs are returned to
AT_STAGINGstatus - The shipment status is set to
CANCELLEDwith the cancellation reason, user, and timestamp recorded - A
shipment.cancelledevent is emitted for downstream consumers (notifications, billing)
How to cancel
- Open the shipment and choose Cancel Shipment.
- Enter a cancellation reason. It's required.
- Confirm.
API: POST /shipments/:id/cancel with { reason }.
Cancellation is atomic
If any step of the cancellation fails (for example, an LPN can no longer be returned to staging because the staging area was deleted), the entire operation is rolled back and the shipment stays in its prior status. Investigate the failure before retrying.
Cannot cancel after dispatch
Once a shipment is DISPATCHED, cancellation is not supported through the platform. You must coordinate directly with the carrier to recall or reroute the shipment, then record the outcome as notes on the shipment.
Returns processing
Not yet available
Returns processing — RMA creation, disposition workflows, refund or exchange processing, restock-to-inventory — is not yet implemented. It's the one gap left in outbound and reverse logistics.
Until it ships, handle inbound receipts of returned goods through the regular Receiving operations flow, with a blind-receiving note that says "customer return" in the comments.
Ask your Zora Tech account team about the returns roadmap.
Mobile support
The loading workflow works on mobile, and it's the better choice on the floor since the camera does the barcode scanning.
- Start Loading, Scan LPN, Complete Loading, Abort, and Remove LPN are all available from the mobile shipment detail page.
- Tracking update and Mark Delivered are available on mobile for drivers and field staff.
See Mobile workflows for the full mobile picking, packing, and loading flow.
Common shipment scenarios
Scenario 1: Same-customer multi-order consolidation
- Create a shipment for the customer.
- Add every ready order with Add Orders.
- Pick each order — the LPNs land in the customer's staging lane.
- Start a loading session and scan all the LPNs.
- Complete loading, manifest, and dispatch.
Scenario 2: Walk-up order added after loading started
- Attach the new order — the shipment is already
LOADING, so use Add Orders the same way. - Pick the new order; the LPN lands in staging.
- Scan the new LPN into the active loading session. Zora expands the expected set automatically.
- Complete loading once the new LPN is verified.
Scenario 3: Customer mismatch at the order stage
- You try to add Customer B's order to Customer A's shipment.
- Zora blocks it and shows the customer-mismatch dialog with the mismatch list.
- Cancel, then create or locate Customer B's own shipment instead.
Scenario 4: Short ship (missing LPN at dock)
- Start loading and scan every LPN you can find.
- One LPN can't be located — call a supervisor.
- The supervisor chooses Complete with Override and enters a reason, e.g. "LPN LPN-4421 not located — investigating."
- The shipment manifests short, and the audit log records the override.
- Once the LPN turns up, create a follow-up shipment for it.
Scenario 5: Cancel and reship
- The customer changes their address after manifest but before dispatch.
- Cancel the shipment with a reason like "customer address change — reshipping."
- The orders return to
READY_TO_SHIPand the LPNs return to staging. - Update the destination on the order, or create a new shipment with the corrected address.
- Reload and re-manifest.
Troubleshooting
| Issue | Solution |
|---|---|
| "Customer mismatch" dialog on Add Orders | Review the mismatched orders. If intentional (e.g. 3PL consolidation), choose Confirm and Add Anyway — the override is audited. Otherwise remove the mismatched orders from the selection. |
| Cannot start loading session (409) | Another user has an active loading session on this shipment. Check GET /loading-sessions/active or the loading dashboard, and either take over or wait for the existing session to complete. |
| LPN scan rejected — "not in warehouse" | The LPN is in a different warehouse. Transfer it to the shipment's warehouse first, or start a separate shipment at the LPN's current warehouse. |
| LPN scan rejected — "customer mismatch" | LPN contents belong to another customer. Return the LPN to staging and route it to the correct customer's shipment. |
| Cannot cancel shipment | Only PLANNED, LOADING, and MANIFEST shipments can be cancelled. For DISPATCHED and later, coordinate with the carrier. |
| Manifest action is disabled | Check that the shipment has at least one loaded LPN, a carrier assigned, and is in a status that allows manifesting (PLANNED with loading complete, or LOADING). |
| Tracking webhook not updating status | Verify the carrier integration credentials in Administration → Carriers. Tracking webhooks require the carrier's API keys and a reachable webhook URL. |
| Audit log entry shows "system" user | System-generated events (e.g. auto-abort triggered by shipment cancellation) are attributed to the system user. The correlating manual action will be recorded in a separate entry with the human user's ID. |
API quick reference
| Operation | Method + Path |
|---|---|
| List shipments | GET /shipments |
| Get shipment | GET /shipments/:id |
| Get full details | GET /shipments/:id/details |
| Create from orders | POST /shipments |
| Create from staging | POST /shipments/from-staging |
| Add orders | PUT /shipments/:id/orders |
| List delivery stops | GET /shipments/:id/stops |
| Reorder delivery stops | PATCH /shipments/:id/stops/reorder |
| Move an order to a stop | PATCH /shipments/:id/orders/:orderId/stop |
| Add LPNs | POST /shipments/:id/lpns |
| Remove LPNs | DELETE /shipments/:id/lpns |
| Start loading | POST /shipments/:id/loading/start |
| Scan LPN | POST /shipments/:id/loading/scan-lpn |
| Validate LPN (no load) | POST /shipments/:id/loading/validate-lpn |
| Loading status | GET /shipments/:id/loading/status |
| Complete loading | POST /shipments/:id/loading/complete |
| Abort loading | DELETE /shipments/:id/loading/abort |
| Remove LPN from session | DELETE /shipments/:id/loading/lpn/:lpnId |
| Supervisor override | POST /shipments/:id/loading/supervisor-override |
| Manifest preview | GET /shipments/:id/manifest-preview |
| Manifest shipment | POST /shipments/:id/manifest |
| Update tracking | PUT /shipments/:id/tracking |
| Dispatch | POST /shipments/:id/dispatch |
| Cancel | POST /shipments/:id/cancel |
| List documents | GET /shipments/:id/documents |
| Upload document | POST /shipments/:id/documents |
| Download document | GET /shipments/:id/documents/:docId/download |
| Get bill of lading | GET /shipments/:id/bol |
| List BOL delivery stops | GET /shipments/:id/bol/stops |
| Save BOL edits | PUT /shipments/:id/bol |
| Reset BOL fields to derived | POST /shipments/:id/bol/reset |
| Render BOL PDF (no revision) | GET /shipments/:id/bol/pdf |
| Issue BOL revision | POST /shipments/:id/bol/issue |
| Sign and file BOL | POST /shipments/:id/bol/sign |
| List BOL revisions | GET /shipments/:id/bol/revisions |
| Ready for pickup | GET /shipments/ready-for-pickup/:warehouseId |
Related guides
- Packing & shipping SOP
- Load planning
- Order processing
- Mobile workflows
- Carrier administration
- Template editor (labels & BOLs)
Need help?
Questions?